Desktop: API Integration
API Integration
Connect to the Trade Apps desktop app step by step: static IP, a paid Connect app on Kite Connect, API key and secret, TOTP key, Connect.
What you need before you start?
#This page connects your account to the Trade Apps desktop app, from start to finish. It takes about 15 minutes the first time. After that, you only press Connect once each trading day.
You will move between two places: the desktop app (Brokers page) and the Kite Connect developer site in your browser. Keep both open.
- Your trading account, active, and your login details for it.
- The Trade Apps desktop app installed, and your Trade Apps login. Your broker account must already show as a card on the Brokers page. If it is not there, WhatsApp support at 9398840360 — accounts are added by our team.
- Your phone with an authenticator app (Google Authenticator, Microsoft Authenticator or Authy), for the TOTP step.
- Already using this broker on the Trade Apps website? Then you already have an API app. Use the same key and secret here; skip to the TOTP step.
Step 1 — Get your static IP in the desktop app
#Brokers accept API orders only from an address you have approved, called a static IP. Trade Apps gives you one with your subscription; free-trial accounts get none.
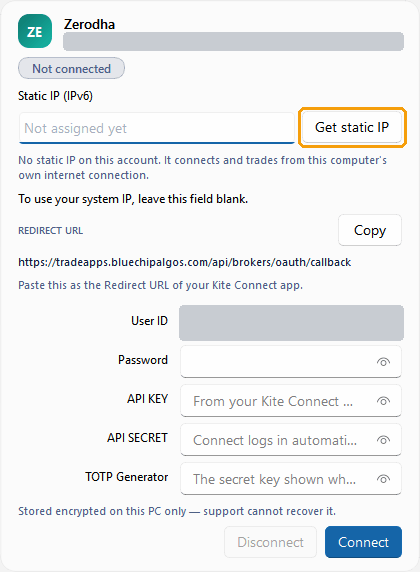
Open the desktop app and click Brokers in the left menu. Find the card for your account. If the Static IP box says Not assigned yet, click Get static IP next to it, then Get static IP again in the box that asks you to confirm.
If you see the message To use your system IP, leave this field blank, that is only for clients who trade without a static IP. With a subscription, get the static IP.
Copy the IP and the redirect URL
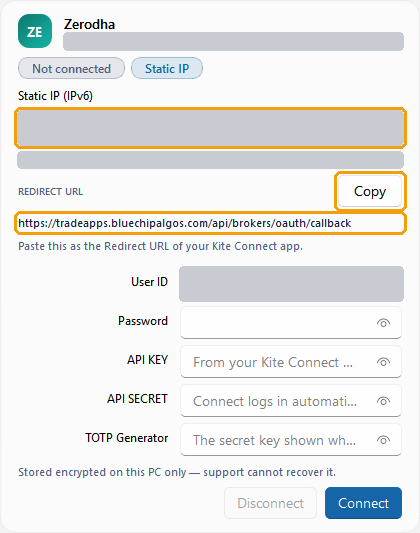
#The box now shows your static IP. If a window titled Whitelist your static IP opens, keep it open while you do the next steps, and click I have whitelisted it only after you have saved the IP at .
Click inside the Static IP box, select the whole address (Ctrl+A) and copy it (Ctrl+C). Then click Copy next to REDIRECT URL — you need both in the next steps.
- Your IP for is an IPv6 address. It is long, with colons — for example 2402:1f00:8300:… Copy the whole thing.
- Paste only the IP. Never add a port number, and never use your home Wi-Fi or mobile IP.
Step 2 — Create a Connect app
#Open the Kite Connect developer site. If you have never used it, click Sign up first — this account is separate from your Kite login. Then log in.
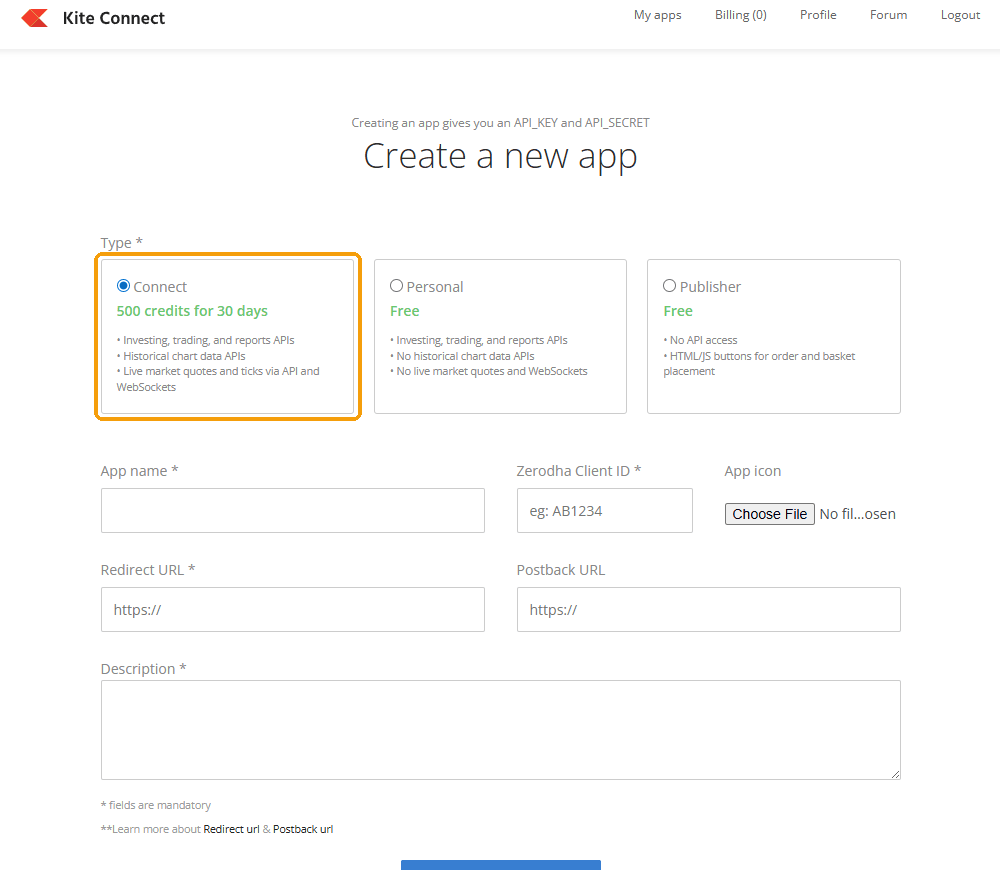
Go to My apps → Create new app. Choose Connect — it is paid, and the desktop needs it for live prices (see The Connect plan pays for prices below). Fill in:
- App name — any name, for example Trade Apps.
- Client ID — your client ID, for example AB1234.
- Redirect URL — paste the one you copied from the desktop card.
- Postback URL — leave empty.
- Description — a few words, for example Algo trading through Trade Apps.
Step 3 — Add your static IP
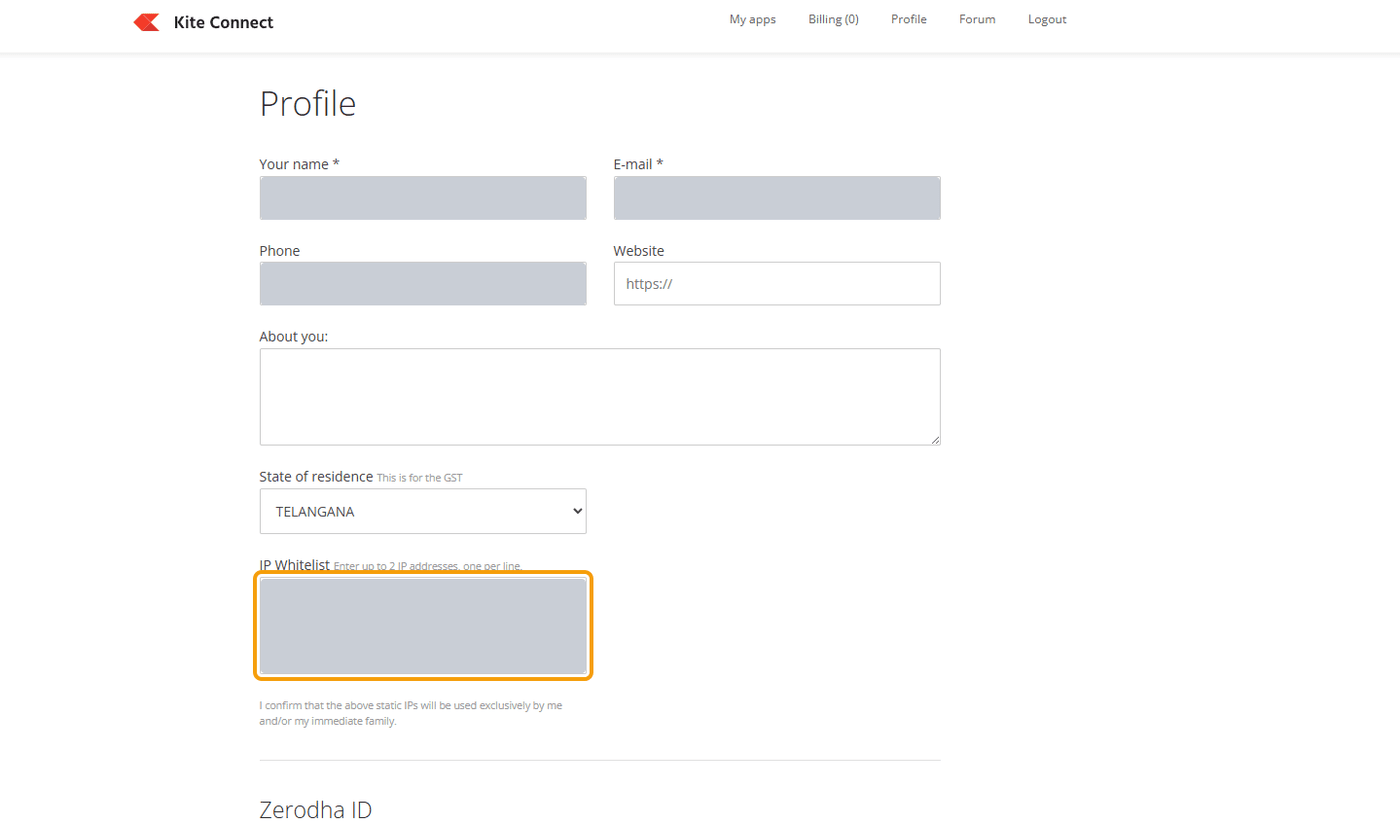
#Click Create. Then click Profile at the top. In IP Whitelist, paste your Trade Apps IP on the first line and click Update at the bottom of the page.
Step 4 — Open your app
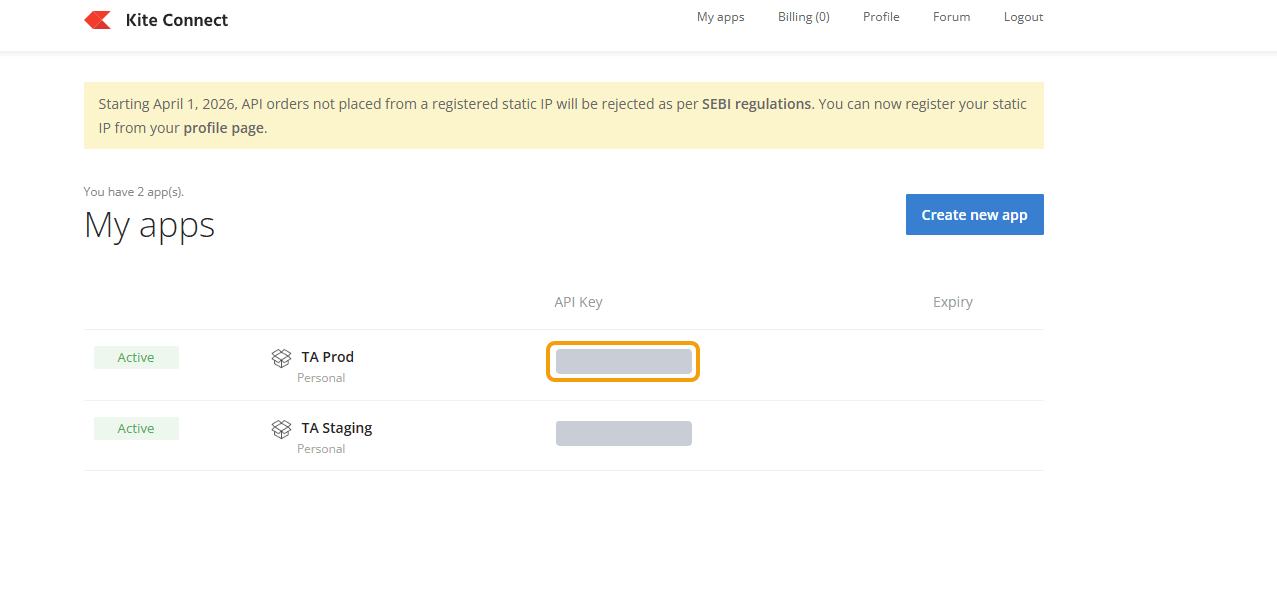
#Click My apps at the top. Your app is listed with its API key. Click the app’s name to open it.
Step 5 — Copy the API key and API secret
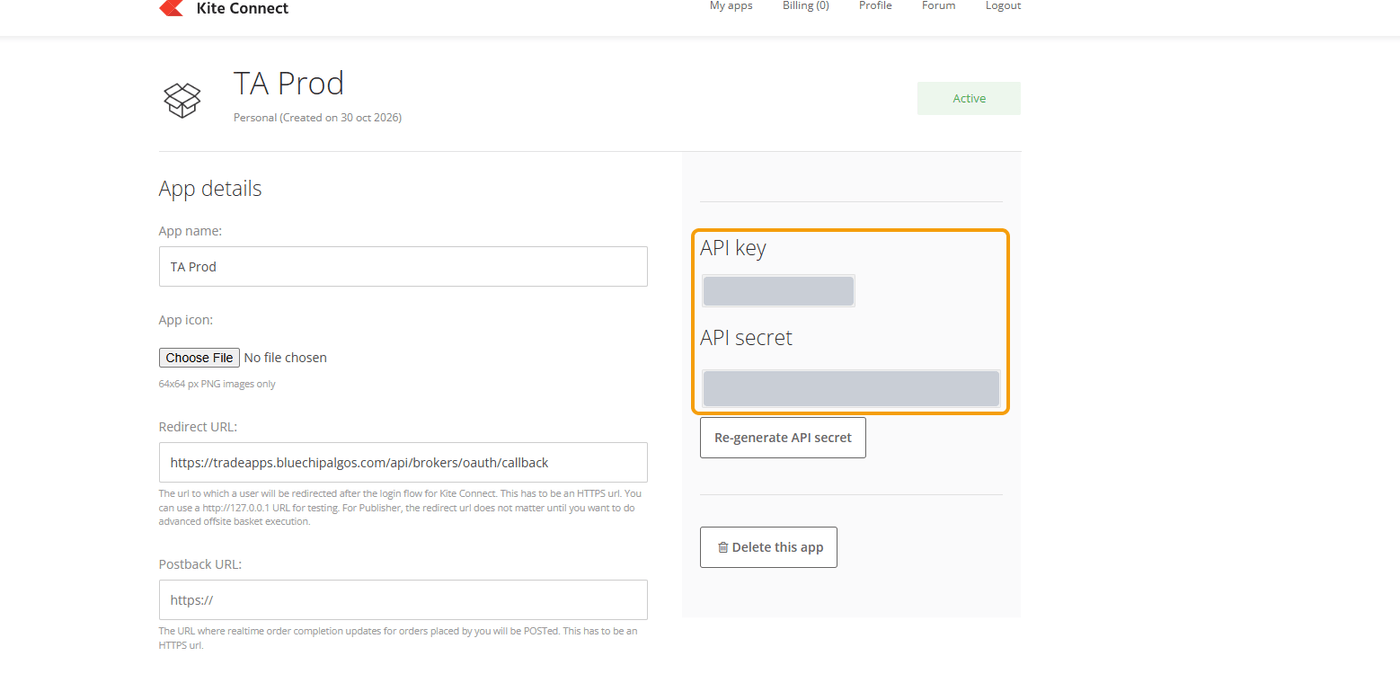
#On the app page, the API key and API secret are on the right. Copy both. Leave Re-generate API secret alone — it would make the old secret stop working.
TOTP 1 — Open Password & Security
#The desktop logs in to your broker by itself each morning, so it needs your TOTP key: the long code of letters and digits behind the QR code your broker shows when you turn TOTP on. From it, the desktop makes the same 6-digit code your authenticator app shows.
Log in to Kite and open your Profile (click your user ID at the top right).
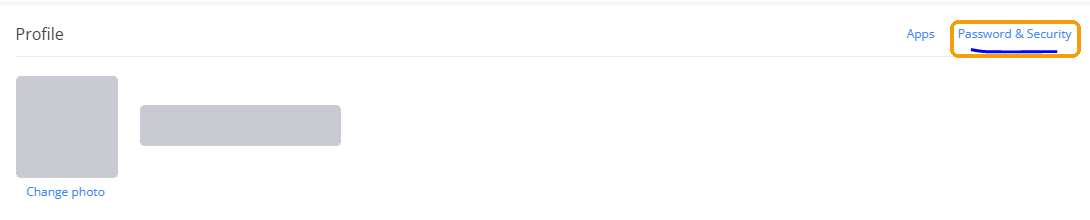
On the profile page, click Password & Security at the top right.
TOTP 2 — Enable external TOTP
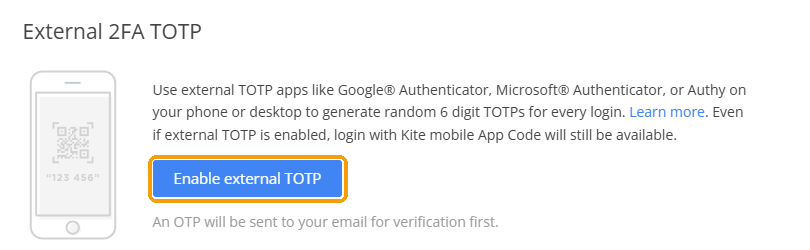
#Scroll down to External 2FA TOTP and click Enable external TOTP.
TOTP 3 — Verify your email
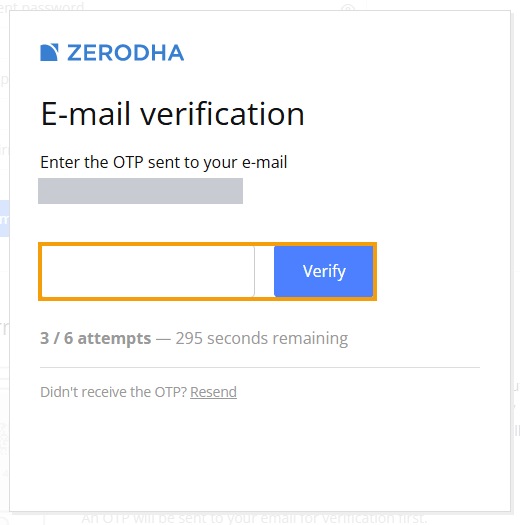
#Kite sends an OTP to your email. Type it and click Verify.
TOTP 4 — Copy the key
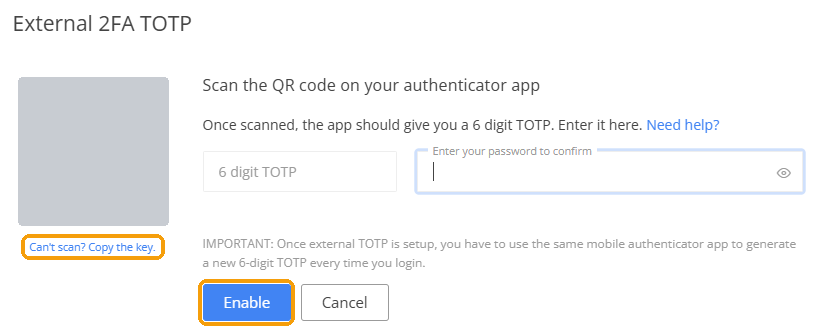
#Kite shows a QR code. Click Can’t scan? Copy the key. under it and copy the key.
Scan the QR code with your authenticator app, type its 6-digit code and your Kite password, and click Enable.
- Copy the key, not the 6-digit code. The code changes every 30 seconds; the key never changes.
- Also scan the QR code with an authenticator app on your phone (Google Authenticator, Microsoft Authenticator or Authy). You need its codes for the broker’s own website and app.
- If TOTP was turned on long ago and you did not save the key, reset TOTP to see a new key, and scan the new QR code on your phone too — the old codes stop working.
- The key is as private as your password. Never send it to anyone, including us.
The Connect plan pays for prices
#The desktop takes its prices from . Only a Connect app gets live prices; a free Personal app does not. That is why Step 2 says to choose Connect.
Connect is paid with Kite Connect credits: 500 credits (Rs 500) for 30 days on 9 Nov 2026. Add credits under Billing on the developer site before you create the app, and keep enough for each renewal. Check the price on that page before you pay.
Already made a Personal app for the website? Make a new Connect app for the desktop, add your static IP and redirect URL to it, and use its key and secret here. The website works with a Connect app too.
Without the plan, orders still go through, but the desktop gets no prices from this broker: Trade Scalper shows (no market-data plan) next to the feed, and a MARKET order is refused because there is no price to check it against. The desktop never borrows prices from another broker.
Fill in the card in the desktop app
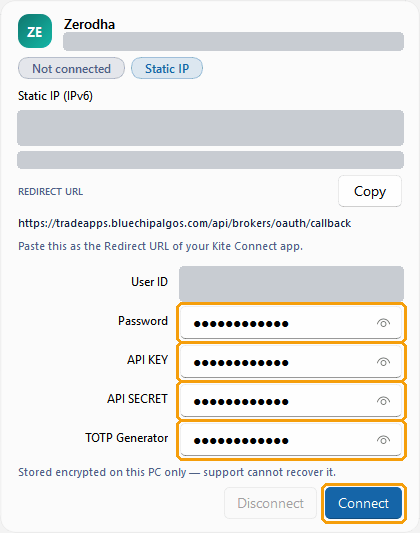
#Go back to the desktop app, Brokers page, your card. Fill in:
- Password — your Kite login password.
- API KEY — the API key of your app.
- API SECRET — the API secret of your app.
- TOTP Generator — the TOTP key you copied.
- Paste each value exactly, with no space before or after. Leave User ID as it is — it comes from your Trade Apps account.
Connect and check it worked
#Click Connect. It saves what you typed and logs in. The desktop logs in with your password and TOTP key in the background; no broker page opens.
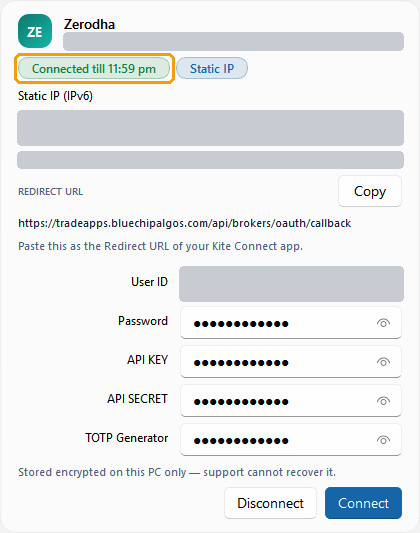
When it worked, the grey Not connected label turns green and says Connected till 11:59 pm. Trade Disc and Trade Scalper both use this connection.
What you typed is saved, encrypted, on this computer only. Each trading day, open the Brokers page and press Connect once before the market opens. You do not repeat the setup. On a second computer you type the details once more.
If it does not work
#If Connect fails, the reason is written in red on the card, under the labels. Check these in order; most failures are one of the first four.
- Wrong IP, or IP saved in the wrong box. In the Kite Connect developer site, the IP must be exactly the one the desktop card shows, in the IPv6 box. After changing it, wait 2 minutes, then press Connect again.
- TOTP key wrong. The TOTP box needs the long key from the TOTP setup, not today’s 6-digit code. If in doubt, turn TOTP off and on at the broker, copy the new key, and paste it again.
- Password or PIN changed at the broker. Type the new one in the card and press Connect.
- Redirect URL has a typo or extra space. Click Copy on the card again and paste it fresh at the broker.
- Key and secret swapped, or a space copied with them. Paste each one again into the right box.
- IP saved on the app but not on Profile. The IP whitelist lives on the Profile page. Check it is there and you clicked Update.
- Connected, but no prices. The app is a Personal app, or the Connect credits ran out. Make a Connect app or add credits under Billing, then press Connect again.
- Still stuck? WhatsApp 9398840360 with a screenshot of the card and the time. Never send your password, PIN, OTP, TOTP key or API secret — we never need them.