Common Platform
Settings
Broker accounts, static IPs, profile, app access, 2FA, password, payments.
ఒక్క చూపులో
#Broker connection, static IPs, profile, app shortcuts, 2FA, password change, payment invoices — వీటన్నిటికీ Settings open చేయండి.
ముఖ్యమైన విషయం — broker accounts ని backend లేదా admin fix చేస్తారు. Clients కొత్త broker account add చేయలేరు, ఉన్నదాన్ని తీసేయలేరు, broker type మార్చలేరు, Client ID లేదా User ID edit చేయలేరు. Allow చేసిన credentials update చేయడం, save చేసిన static IP select చేయడం, connect, reconnect, disconnect, static IPs save చేయడం — ఇవి మాత్రమే చేయగలరు.
Broker Accounts section
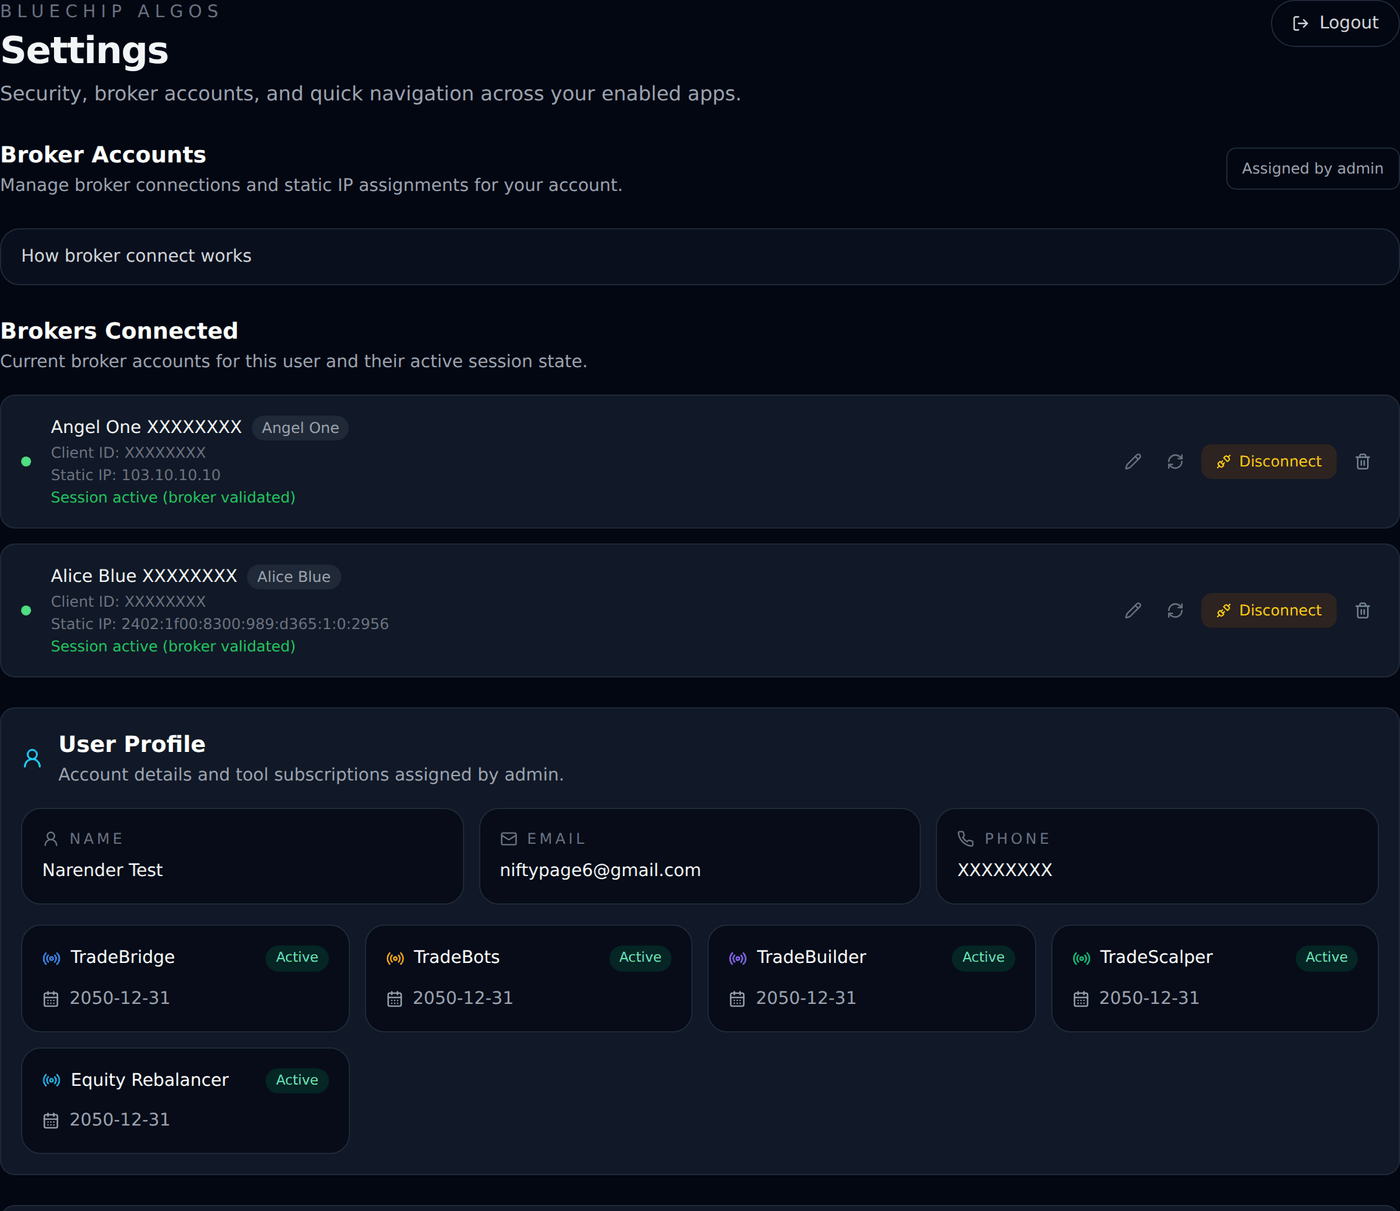
#Settings లో ఇదే మొదటి పెద్ద section. Bluechip Algos admin లేదా support మీ user కి assign చేసిన broker accounts ఇక్కడ కనిపిస్తాయి.
ఈ page నుంచి client కొత్త broker account create చేయలేరు. ఏ broker కనిపించకపోతే, ఇంకా ఏదీ assign అవలేదని లేదా మీరు సరిగ్గా login అవలేదని అర్థం. మీరే add చేయడానికి try చేయకుండా support ని contact చేయండి.
Assigned by admin
#Broker accounts ని backend లేదా admin control చేస్తారు కాబట్టి page లో "Assigned by admin" అని కనిపిస్తుంది.
అంటే broker type, Client ID లేదా User ID మేము fix చేస్తాం. అవి client edit చేసే fields కాదు. మీ Client ID తప్పుగా ఉంటే Bluechip Algos support ని contact చేయండి, ఇంకో account create చేయకండి.
Broker connect ఎలా జరుగుతుంది?
#Assign అయిన ప్రతి broker account కి correct API credentials ఉండాలి, అవసరమైన చోట broker API portal లో static IP whitelist అయి ఉండాలి.
Credentials save చేశాక Connect లేదా Reconnect వాడండి. , కి app broker authentication page open చేసి, broker login అయ్యాక తిరిగి వస్తుంది.
Redirect URLs
#Support ఉన్న broker integrations కి Settings లో Redirect URLs కనిపిస్తాయి.
మీ broker కి కనిపించిన exact redirect URL ని copy చేసి, broker Redirect URL, Callback URL, లేదా App URL అడిగితే అక్కడ ఇవ్వండి. Copy option ఉంటే చేతితో type చేయకండి.
Brokers Connected list
#Assign అయిన ప్రతి broker account ఒక card గా ఈ list లో కనిపిస్తుంది.
ప్రతి card లో broker label, broker type, Client ID లేదా User ID, select చేసిన Static IP, session status ఉంటాయి. Edit, connect లేదా reconnect, disconnect, delete icons కూడా ఉంటాయి. Assign అయిన accounts ని admin మాత్రమే తీసేయగలరు కాబట్టి delete disable చేసి ఉంటుంది.
Label
#Assign అయిన broker account కి కనిపించే పేరు ఇది, ఉదాహరణకి ABC123.
Edit form లో Label disable చేసి ఉంటుంది, client దాన్ని మార్చలేరు. Label గందరగోళంగా లేదా తప్పుగా ఉంటే support ని contact చేయండి.
Broker Type
#ఆ account ఏ broker దో Broker Type చూపిస్తుంది — , , లేదా .
Edit form లో ఇది disable చేసి ఉంటుంది. Settings నుంచి ని గా లేదా గా మార్చలేరు. Broker type ని backend లేదా admin fix చేస్తారు.
Client ID / User ID
#ఈ user కి assign అయిన broker account ID ఇదే.
Settings లో ఈ field disable చేసి ఉంటుంది, client దాన్ని edit చేయలేరు. ఇది కావాలనే — orders Bluechip Algos assign చేసిన broker client ID కే వెళ్ళాలి. ఈ value తప్పుగా ఉంటే 9398840360 కి WhatsApp చేయండి.
Edit icon
#పెన్సిల్ icon ఆ broker account కి Broker Credentials form ని open చేస్తుంది.
Allow చేసిన fields — API Key, అవసరమైతే API Secret, Static IP selection — వీటిని update చేయడానికి మాత్రమే దీన్ని వాడండి. Broker type లేదా Client ID మార్చడానికి కాదు.
API Key, API Secret
#API Key ని broker API లేదా developer portal నుంచి తీసుకుంటారు. లాంటి కొన్ని brokers కి API Secret కూడా కావాలి.
Save చేశాక ఈ fields కనిపించవు. Credentials ఇప్పటికే save అయి ఉంటే field protected గా కనిపిస్తుంది. Save అయిన value ని మార్చాలనుకున్నప్పుడే ఆ secret field లోపల edit నొక్కండి. ముట్టుకోకపోతే పాత value అలాగే ఉంటుంది.
Save Credentials button
#Save Credentials ఆ broker account కి update చేసిన credential fields ని store చేస్తుంది.
అది తనంతట తానే broker ని connect చేయదు. Credentials save చేశాక broker card మీద Connect లేదా Reconnect వాడండి. Subscription active గా లేకపోతే credential update లేదా broker connect block అవొచ్చు.
Connect button
#Connect broker login page ని popup లో లేదా కొత్త window లో open చేస్తుంది.
అక్కడ broker login పూర్తి చేయండి. Login అయ్యాక platform తిరిగి వచ్చి broker session status ని update చేస్తుంది. Popup block అయితే ఈ site కి popups allow చేసి Connect మళ్ళీ నొక్కండి.
Reconnect button
#Broker ఇప్పటికే connect అయి ఉంటే అదే button మీద Reconnect అని కనిపిస్తుంది.
Broker session రోజూ expire అయితే, ప్రతి ఉదయం market open కి ముందు Reconnect చేయండి. Status Expired లేదా Invalid అయినప్పుడు కూడా వాడండి. Example — నిన్న connect చేశారు, ఈరోజు orders ఆగిపోతున్నాయంటే ముందు reconnect చేయండి.
Disconnect icon
#Support ఉన్న చోట Disconnect ఇప్పటి active broker session ని తీసేస్తుంది.
ఈ browser లేదా platform session నుంచి live broker orders పడకూడదని మీరు కావాలనుకున్నప్పుడు దీన్ని వాడండి. ఇది broker account ని delete చేయదు, ఇప్పటికే broker దగ్గర పడిన orders ని cancel చేయదు.
Delete icon disable చేసి ఉంటుంది
#Trash లేదా delete icon కనిపిస్తుంది కానీ clients కి disable చేసి ఉంటుంది.
Assign అయిన broker accounts ని admin లేదా support మాత్రమే తీసేయగలరు. Subscription, orders, history తో link అయిన broker account పొరపాటున పోకుండా ఇది కాపాడుతుంది.
Broker status
#Broker card మీద status కనిపిస్తుంది.
"Session active" అంటే broker login valid గా ఉందని. "Session expired" అంటే reconnect చేయాలని. "Session invalid" అంటే credentials లేదా session తప్పుగా ఉండొచ్చని, reconnect కావాలని. "Not connected" అంటే connect చేసేదాకా live broker actions block అవుతాయని.
మీ static IP ఎక్కడ కనిపిస్తుంది?
#ప్రతి broker account మీద దాని సొంత static IP కనిపిస్తుంది, ఎప్పటిదాకా valid అనే date తో పాటు. దాన్ని మీరు మార్చలేరు: IP ని platform ఇస్తుంది, అవసరమైనప్పుడు మారుస్తుంది, అందుకే ఇక్కడ మీరు type చేయాల్సిన, select చేయాల్సిన పని లేదు.
ఆ IP నే మీ broker developer portal లో పెట్టాలి — IP ఒక్కటే, port లేకుండా. Account మీద ఇంకా IP కనిపించకపోతే Get static IP నొక్కండి, దానికి ఒక IP వస్తుంది.
portal లో IP కి నాలుగు boxes కనిపిస్తాయి — Primary, Secondary IPv4, ఇంకా Primary, Secondary IPv6. మీ IP ఒక IPv6 address, కాబట్టి దాన్ని Primary IPv6 లేదా Secondary IPv6 box లోనే పెట్టండి (IPv4 లో కాదు).
Account కి static IP లేకపోతే
#IP కనిపించకపోతే, Get static IP admin ని contact చేయమని చెప్తే, WhatsApp 9398840360 కి మీ registered email, broker account పంపండి.
మీ సొంత IP ఎప్పుడూ పెట్టకండి — ఇంటి Wi-Fi, office లేదా mobile internet IP పనిచేయదు, ఎందుకంటే orders మేము ఇచ్చిన IP నుంచే వెళ్తాయి. Internet provider ఇచ్చిన static IP వాడాలనుకుంటే support కి చెప్పండి, admin set చేస్తారు.
User Profile
#Login అయిన account కి Name, Email, Phone ఇక్కడ కనిపిస్తాయి.
ఈ page లో ఇవి చూడటానికి మాత్రమే. పేరు, email, లేదా phone తప్పుగా ఉంటే support ని contact చేయండి. రెండో account create చేయకండి — subscriptions, broker accounts ఉన్న user కే link అయి ఉంటాయి.
Subscription cards
#Trade Bridge, Trade Bots, Trade Builder, Trade Scalper లాంటి apps కి product access ఈ cards చూపిస్తాయి.
Active అంటే ఇప్పుడు వాడొచ్చని. Expired అంటే subscription date అయిపోయిందని. Disabled అంటే ఆ product మీ account కి enable అవలేదని.
Apps section
#మీ account కి enable అయిన platform apps కి shortcuts ఇక్కడ కనిపిస్తాయి.
ఏదైనా app card నొక్కితే ఆ app dashboard open అవుతుంది. "Current app" అంటే మీరు ఇప్పటికే ఆ app లోనే ఉన్నారని.
Authenticator App 2FA
#2FA అంటే two-factor authentication. Password తో పాటు authenticator app code కూడా అడుగుతుంది.
2FA Enabled గా ఉందా Disabled గా ఉందా అని Settings page చూపిస్తుంది. Google Authenticator, Microsoft Authenticator, Authy లాంటి apps పని చేస్తాయి.
Generate QR Code
#2FA off లో ఉంటే, ఇప్పటి platform password ఇచ్చి Generate QR Code నొక్కండి.
ఒక QR code, ఒక manual setup key కనిపిస్తాయి. మీ authenticator app open చేసి కొత్త account add చేసి QR code scan చేయండి, తర్వాత app లో కనిపించే 6-digit code ఇవ్వండి.
Enable 2FA button
#QR code scan చేశాక 6-digit authenticator code ఇచ్చి Enable 2FA నొక్కండి.
తర్వాతి login నుంచి password, authenticator code రెండూ కావాలి. ఆ 6-digit code పని చేయకపోతే app లో తర్వాతి code వచ్చేదాకా ఆగి try చేయండి.
Reset 2FA
#2FA ఇప్పటికే on లో ఉంటే, Generate QR Code బదులు Settings లో Reset 2FA కనిపిస్తుంది.
ఇప్పటి password ఇచ్చి Reset 2FA నొక్కండి. వెంటనే కొత్త QR code కనిపిస్తుంది. దాన్ని scan చేసి కొత్త 6-digit code ఇచ్చి setup మళ్ళీ పూర్తి చేయండి.
Password Change
#Password Change తో Bluechip Algos platform password మాత్రమే మారుతుంది.
మీ broker password మారదు. Password change అయ్యాక platform మిమ్మల్ని sign out చేసి, కొత్త password తో మళ్ళీ login చేయమని అడుగుతుంది.
Password fields
#Current Password అంటే ఇప్పటి Bluechip Algos password. New Password అంటే మీరు కొత్తగా పెట్టుకోవాలనుకున్నది. Confirm New Password, New Password తో సరిగ్గా match అవ్వాలి.
ఈ page protected secret fields వాడుతుంది. Field దాచి ఉంటే, type చేసే ముందు దాని లోపల edit control నొక్కండి.
Password rules
#కొత్త password కనీసం 8 characters ఉండాలి, అందులో uppercase letter, lowercase letter, number, special character ఉండాలి. Spaces allow చేయరు.
Rule ఒక example — ఒక capital letter, ఒక small letter, ఒక number, ఒక symbol, మొత్తం length 8 లేదా అంతకంటే ఎక్కువ. Broker password ని platform password గా వాడకండి.
Cancel button
#Cancel password ని మార్చకుండా మిమ్మల్ని app dashboard కి లేదా launcher కి తీసుకెళ్తుంది.
పొరపాటున password change open చేస్తే Cancel వాడండి.
Payments section
#ఈ account payment history ని Payments చూపిస్తుంది.
Payments load అవుతుంటే table వచ్చేదాకా ఆగండి. Payments లేకపోతే "No payments found" అని కనిపిస్తుంది.
Payment Date, reference
#Payment ఎప్పుడు record అయిందో Payment Date చూపిస్తుంది.
దాని కింద చిన్న అక్షరాల్లో ఉన్నది payment reference. Payment problem ఉంటే ఆ reference support కి చెప్పండి.
Service, duration
#ఏ product subscription కొన్నారో Service చూపిస్తుంది.
Duration లో ఎన్ని నెలలో, subscription start, end dates ఉంటాయి.
Payments లో Broker, Client ID
#ఆ payment కి link అయిన broker, Client ID payment table లో కనిపించొచ్చు.
ఇది history information మాత్రమే. Settings నుంచి client Client ID edit చేయొచ్చని కాదు — అది backend లేదా admin control లోనే ఉంటుంది.
Billing, tax, amount
#Capture అయిన చోట billing state లేదా IP ని Billing చూపిస్తుంది. Billing details ని బట్టి CGST+SGST లేదా IGST ని Tax చూపిస్తుంది. మొత్తం paid, base amount, GST ని Amount చూపిస్తుంది.
Official payment copy కావాలంటే invoice download వాడండి.
Download Invoice
#Download Invoice ఆ payment కి invoice PDF ని download చేస్తుంది.
Download start అవకపోతే browser popup లేదా download permissions చూడండి, లేదా payment reference తో support ని contact చేయండి.
Live trading కి ముందు
#Live trading కి ముందు ఇవి confirm చేసుకోండి — product subscription Active గా ఉందా, correct broker card కనిపిస్తోందా, broker status "Session active" గా ఉందా, app మీరు అనుకున్న Live లేదా Forward Testing mode లో ఉందా.
Broker status Not connected, Expired, లేదా Invalid అయితే, live orders పెట్టే ముందు లేదా automation నడుస్తుందని ఆశించే ముందు connect లేదా reconnect చేయండి.
Settings, app configuration — తేడా
#Settings అనేది account security, assign అయిన broker accounts, static IPs, payments కోసం.
App configuration pages వేరు. Example — Trade Scalper Configuration లో Trade Scalper defaults ఉంటాయి, అంటే default broker, mode, segment, strike view, terminal order behaviour.
Support జాగ్రత్త
#Settings సాయం కావాలంటే మీరు register చేసిన phone లేదా email, broker పేరు, error screenshot, దాదాపు ఎన్ని గంటలకో — ఇవి పంపండి.
Broker password, OTP, API secret, TOTP secret key, పూర్తి access token, పూర్తి webhook token — వీటిని public messages లో ఎప్పుడూ పంపకండి. Broker setup సాయానికి WhatsApp 9398840360 వాడండి.