Common Platform
Settings
Detailed guide for the Settings page: broker accounts, static IPs, profile, app access, 2FA, password, and payments.
Overview
#Open Settings to manage broker connection, static IPs, profile view, app shortcuts, 2FA, password change, and payment invoices.
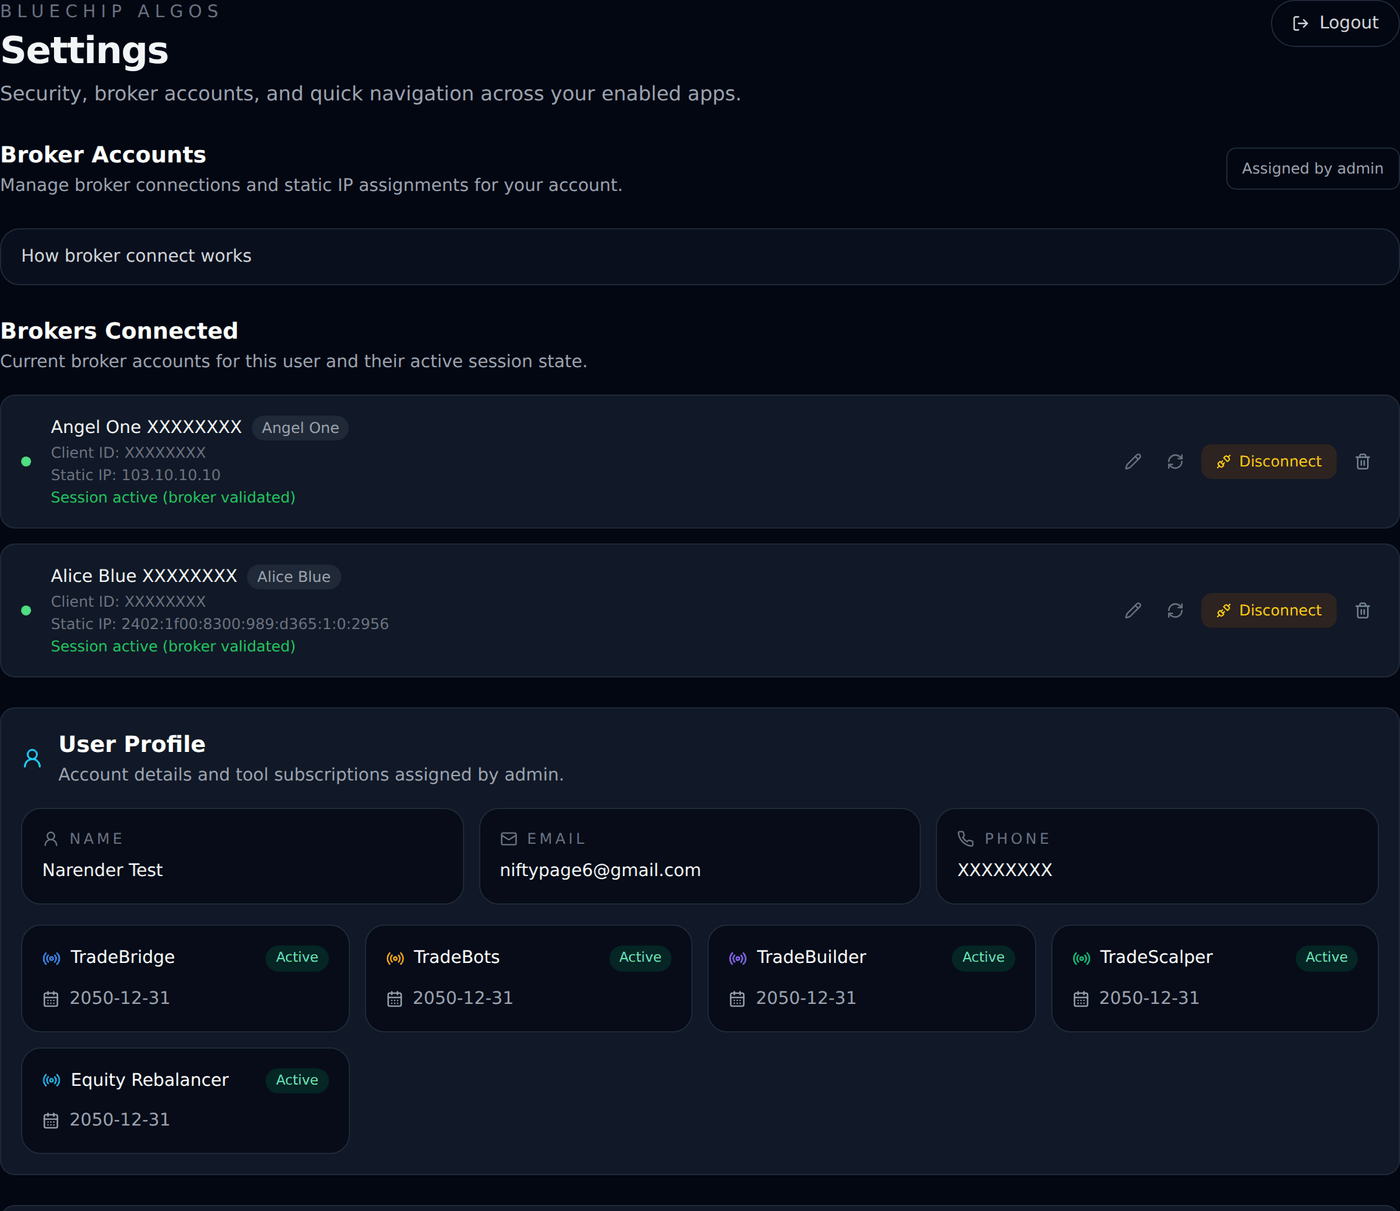
Important: broker accounts are fixed from backend/admin. Clients cannot add a new broker account, remove a broker account, change broker type, or edit broker Client ID/User ID from Settings. They can only update allowed credentials, choose a saved static IP, connect, reconnect, disconnect, and save static IPs.
Broker Accounts section
#This is the first major section inside Settings. It shows broker accounts already assigned to your user by Bluechip Algos admin/support.
A client cannot create a new broker account from this page. If no broker is shown, it means no broker account is assigned to your user yet, or you are not logged in correctly. Contact support instead of trying to add it yourself.
Assigned by admin
#The page shows an Assigned by admin label because broker accounts are controlled from backend/admin.
This means broker type and Client ID/User ID are fixed by us. They are not client-editable fields. If your Client ID is wrong, contact Bluechip Algos support; do not create another account.
How broker connect works?
#The page explains that each assigned broker account must have correct API credentials and, where required, a static IP whitelisted in the broker API portal.
After credentials are saved, use Connect or Reconnect. For and , the app can open the broker authentication page and return after successful broker login.
Redirect URLs
#Settings can show Redirect URLs for supported broker integrations.
Copy the exact redirect URL shown for your broker and use it in the broker API/developer portal if the broker asks for Redirect URL, Callback URL, or App URL. Do not type it manually if copy is available.
Brokers Connected list
#The Brokers Connected list shows each assigned broker account as a card.
Each card shows broker label, broker type, Client ID/User ID, selected Static IP if any, and session status. It also shows action icons for edit, connect/reconnect, disconnect, and delete. Delete is disabled because only admin can remove assigned broker accounts.
Label
#Label is the name shown for the assigned broker account, such as ABC123.
In the edit form, Label is disabled. The client cannot change it. If the label is confusing or wrong, contact support.
Broker Type
#Broker Type shows which broker the assigned account belongs to, such as , , or .
In the edit form, Broker Type is disabled. The client cannot change to or from Settings. Broker type is fixed from backend/admin.
Client ID / User ID
#Client ID or User ID is the broker account ID assigned to this user.
This field is disabled in Settings. The client cannot edit it. This is intentional because orders must go only to the broker client ID assigned by Bluechip Algos/admin. If this value is wrong, message WhatsApp 9398840360.
Edit account icon
#The pencil icon opens the Broker Credentials form for that assigned broker account.
Use this only to update allowed fields such as API Key, API Secret where required, and Static IP selection. It does not allow changing broker type or Client ID/User ID.
API Key and API Secret
#API Key is entered from the broker API/developer portal. API Secret is also required for some brokers such as .
These fields are hidden after saving. If credentials are already saved, the field shows a protected/secret state. Click edit inside the secret field only when you want to replace the saved value. If you leave a saved secret untouched, the old saved value remains.
Save Credentials button
#Save Credentials stores the updated credential fields for the assigned broker account.
It does not connect the broker by itself. After saving credentials, use Connect or Reconnect on the broker card. If subscription is inactive, credential update or broker connect may be blocked.
Connect button
#Connect opens the broker login/authentication page in a popup or new browser window.
Complete broker login there. After successful login, the platform redirects back and updates the broker session status. If popup is blocked, allow popups for the site and click Connect again.
Reconnect button
#When a broker is already connected, the same button may show Reconnect.
Use Reconnect every morning before market open if the broker session expires daily. Also use it when status is Expired or Invalid. Example: If you connected yesterday and today orders are blocked, reconnect first.
Disconnect icon
#Disconnect removes the current active broker session where supported.
Use it when you intentionally want to stop this browser/platform session from placing live broker orders. It does not delete the broker account and it does not cancel orders already placed at the broker.
Delete icon is disabled
#The trash/delete icon is visible but disabled for clients.
Assigned broker accounts can only be removed by admin/support. This prevents accidental removal of a broker account that is linked to subscription, orders, and history.
Broker status
#Broker status appears on the broker card.
Session active means broker login is valid. Session expired means reconnect is needed. Session invalid means credentials/session may be wrong and reconnect is needed. Not connected means live broker actions are blocked until you connect.
Where your static IP is shown?
#Each broker account shows its own static IP, with the date it is valid till. You cannot edit it: the platform assigns the IP and changes it when it needs to, so there is nothing here for you to type or choose.
That IP is what you add in your broker developer portal — the IP alone, without a port. If the account shows no IP yet, press Get static IP and one is assigned to it.
's portal shows four IP boxes — Primary and Secondary IPv4, and Primary and Secondary IPv6. Your IP is an IPv6 address, so paste it in the Primary IPv6 or Secondary IPv6 box only (not IPv4).
If your account has no static IP
#If no IP is shown and Get static IP asks you to contact admin, WhatsApp Bluechip Algos on 9398840360 with your registered email and the broker account.
Never enter an IP of your own — a home Wi-Fi, office or mobile internet IP will not work, because orders go out through the IP we assign. If you have a static IP from your internet provider and want that used instead, tell support and admin will set it up.
User Profile
#User Profile shows Name, Email, and Phone for the logged-in account.
These are display fields on this page. If name, email, or phone is wrong, contact support. Do not create a second account because subscriptions and broker accounts are linked to the existing user.
Subscription cards
#The subscription cards show product access for apps such as Trade Bridge, Trade Bots, Trade Builder, and Trade Scalper.
Active means the product can be used now. Expired means the subscription date is over. Disabled means that product is not enabled for your account.
Apps section
#Apps section shows shortcuts to platform apps enabled for your account.
Click an app card to open that app dashboard. Current app means you are already inside that app context.
Authenticator App 2FA
#2FA means two-factor authentication. It asks for an authenticator app code in addition to your password.
The Settings page shows whether 2FA is Enabled or Disabled. Supported apps can include Google Authenticator, Microsoft Authenticator, Authy, or similar authenticator apps.
Generate QR Code
#If 2FA is disabled, enter your current platform password and click Generate QR Code.
The page shows a QR code and a manual setup key. Open your authenticator app, add a new account, scan the QR code, and then enter the 6-digit code shown in the authenticator app.
Enable 2FA button
#After scanning the QR code, enter the 6-digit authenticator code and click Enable 2FA.
From the next login, you need both password and authenticator code. If the 6-digit code fails, wait for the next code in the app and try again.
Reset 2FA
#If 2FA is already enabled, Settings shows Reset 2FA instead of Generate QR Code.
Enter your current password and click Reset 2FA. The page immediately shows a new QR code. Scan the new QR code and enter the new 6-digit code to complete setup again.
Password Change
#Password Change lets you change only the Bluechip Algos platform password.
It does not change your broker password. After password change succeeds, the platform signs you out and asks you to login again with the new password.
Password fields
#Current Password is your existing Bluechip Algos password. New Password is the password you want to use. Confirm New Password must match New Password exactly.
The page uses protected secret fields. Click the edit control inside a secret field before typing if the field is hidden/protected.
Password rules
#New password must have at least 8 characters with uppercase letter, lowercase letter, number, and special character. Spaces are not allowed.
Example of the rule: one capital letter, one small letter, one number, one symbol, and total length 8 or more. Do not use your broker password as your platform password.
Cancel button
#Cancel leaves the password unchanged and takes you back to the current app dashboard or launcher.
Use Cancel if you opened password change by mistake.
Payments section
#Payments shows payment history for this account.
If payments are loading, wait for the table. If there are no payments, the page shows No payments found.
Payment Date and reference
#Payment Date shows when the payment was recorded.
The smaller text below it is the payment reference. Share this reference with support if there is a payment-related issue.
Service and duration
#Service shows which product subscription was purchased.
Duration shows the number of months and the subscription start/end dates.
Broker and Client ID in payments
#The payment table can show broker and Client ID linked to that payment.
This is history information. It does not mean the client can edit Client ID from Settings. Client ID remains backend/admin controlled.
Billing, tax, and amount
#Billing shows billing state/IP when captured. Tax shows CGST+SGST or IGST depending on billing details. Amount shows total paid, base amount, and GST.
Use invoice download for official payment copy where available.
Download Invoice
#Download Invoice downloads the invoice PDF for that payment.
If download does not start, check browser popup/download permissions or contact support with the payment reference.
Before live trading
#Before live trading, confirm product subscription is Active, the correct assigned broker card is visible, broker status is Session active, and the app is in the intended Live or Forward Testing mode.
If broker status is Not connected, Expired, or Invalid, connect/reconnect before placing live orders or expecting automation to run.
Settings vs app configuration
#Settings is for common account security, assigned broker accounts, static IPs, and payments.
App configuration pages are different. Example: Trade Scalper Configuration stores Trade Scalper defaults such as default broker, mode, segment, strike view, and terminal-order behavior.
Support safety
#For Settings help, share your registered phone/email, broker name, screenshot of the error, and approximate time.
Never share broker password, OTP, API secret, TOTP secret key, full access token, or full webhook token in public messages. For broker setup help, use WhatsApp 9398840360.