Discretionary Trading Tools
Trade Disc Option Chain
Where a leg starts — B and S on a strike, the greeks columns, any listed expiry, and what the coloured chips mean.
The chain is where a leg starts
#The option chain runs down the left of the Trade Disc terminal. It is the only place a new leg is created: you press B or S beside a strike and that leg drops into the Entries table above.
Nothing is sent to your broker at that moment. B and S only stage a leg; the order goes out when you press Place Order in Entries.
The chain also shows you what you are already holding. A small coloured chip floats above the premium on any strike you have a position on, so you can see your book against the market without reading a table.
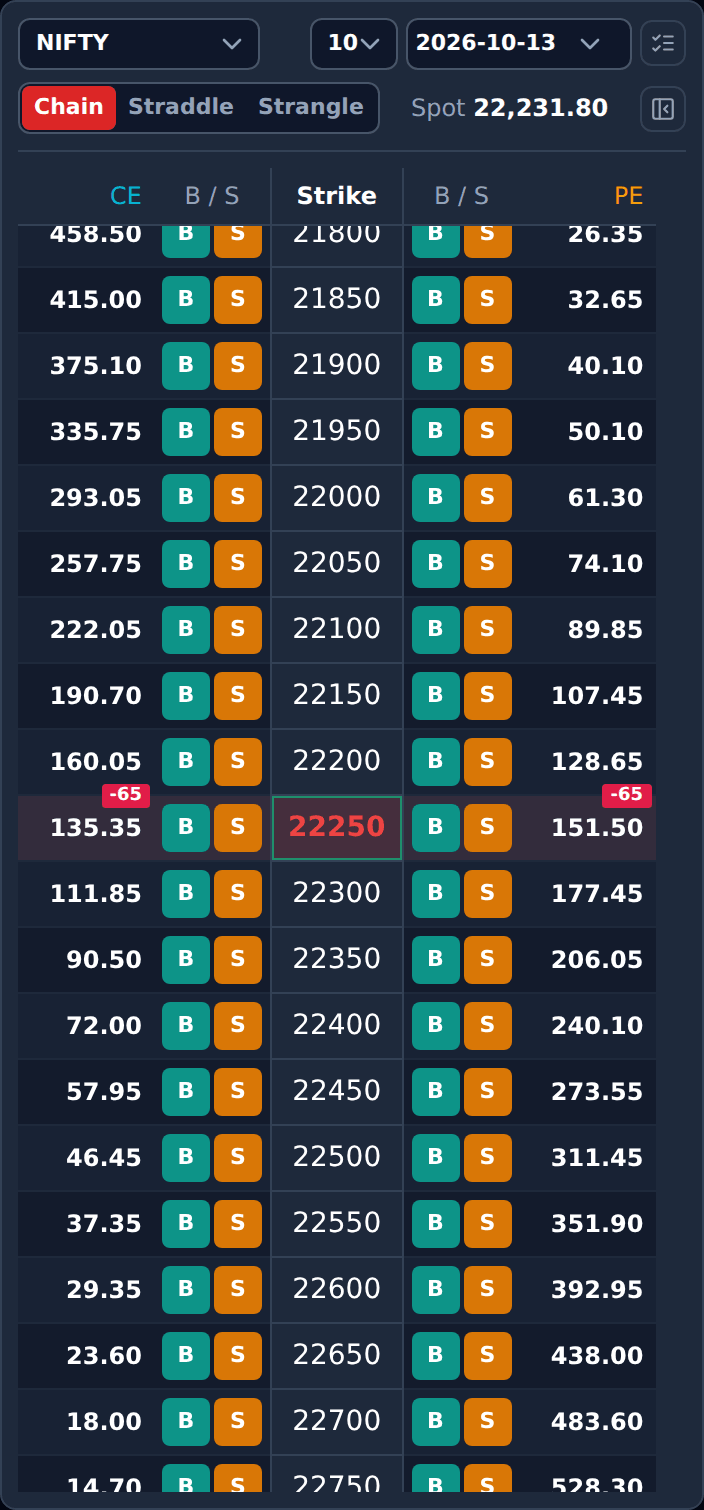
Reading one row
#The strike is in the middle, boxed. The call (CE) side is on the left of it and the put (PE) side on the right — the layout every option chain in India uses.
The strike nearest the market is tinted red and the chain scrolls itself to that row when it opens, so you start at the money without hunting for it.
Above the table the line reads Spot 24,250 — the level of the index itself, which is what the strikes are measured against.
Three views: Chain, Straddle, Strangle
#The second line of the chain header starts with three buttons side by side — Chain, Straddle and Strangle. They are three ways to read the same prices. Pick the one that matches how you trade; the terminal remembers it on this browser.
Chain is the normal option chain described on this page: every strike, the call and the put apart, a B and S for each side.
Straddle shows Strike first, then CE, PE, CE + PE and one B / S. CE and PE are the call and the put of that same strike, and CE + PE is the two added together. With NIFTY at 24,250, if the 24,250 CE is at Rs 120 and the 24,250 PE at Rs 110, the row reads 24250, 120.00, 110.00, 230.00.
Strangle does not show strikes at all. ATM sits in the middle, OTM 1, OTM 2, OTM 3… above it and ITM 1, ITM 2, ITM 3… below it. Each row is one call and one put the same number of strikes away from the money. With 24,250 at the money and strikes 50 apart, OTM 2 is the 24,350 CE plus the 24,150 PE, and ITM 2 is the mirror — the 24,150 CE plus the 24,350 PE. The CE and PE columns show the price of each of those two contracts, so you can see what each leg costs. Hover over a row to see which two strikes it is.
In both of these views, B or S puts both legs into Entries at once — the call and the put, same direction, one lot each. Change the lots in Entries before you press Place Order, exactly as for any other leg.
The number of rows follows No. of strikes to show. A row the exchange does not list a contract for is simply left out, so a far in-the-money strangle can have fewer rows than you asked for.
Choosing the columns
#By default the chain shows the last traded premium and the B / S buttons, and nothing else. That is deliberate: a narrow chain leaves the room for the panels that change positions.
The small icon at the top right of the chain opens Greeks and columns. Tick what you want and it appears on both sides of the strike at once, calls on the left and puts on the right.
- Bid and Ask — the best buying and selling prices standing in the market right now.
- IV — implied volatility, how expensive the option is in volatility terms rather than in rupees.
- Delta — roughly how much the premium moves for a one-point move in the index.
- Theta — how much the premium loses to one day passing.
- Gamma — how fast the delta itself changes.
- Vega — how much the premium moves for a one-point change in IV.
- OI and Vol — open interest and the day’s traded volume on that contract.
Symbol, and how many strikes to show
#The picker on the left of the chain header chooses the underlying: NIFTY, BANKNIFTY, SENSEX, CRUDEOIL, CRUDEOILMINI and NATURALGAS.
Changing it never blanks the chain. The strikes you were looking at stay on screen until the new ones arrive, so the panel does not flash empty every time you switch.
The small number beside it is No. of strikes to show — 10, 15, 20, 25 or 30 on each side of the money. Ten is the default.
One honest limitation: above 15, the in-the-money side runs out before the out-of-the-money side does. Picking 25 gives you a full ladder of 25 out-of-the-money strikes and a shorter one on the in-the-money side. Nothing is wrong — those strikes are simply not being carried.
Any listed expiry, not just this week
#The Expiry picker lists every expiry the exchange has listed — this week, next week, the monthlies, and the far months a year out.
The nearest weekly and the nearest monthly are the two the platform keeps ready all the time, so they appear instantly. Any other date is built when you ask for it, which takes a moment the first time.
When you are on one of those other dates the picker turns red. That is the reminder that you have left the standing chain, not a warning that anything is wrong.
Everything downstream follows the expiry you picked: staging a leg, placing it, shifting its strike, the Custom strike list and the bulk shift buttons all work on that leg’s own ladder.
BANKNIFTY and the MCX commodities have no weekly expiry. Their nearest listed expiry is a monthly one, and that is what opens by default.
B and S — staging a leg
#B stages a BUY of that contract. S stages a SELL. The button you press is on the side you want: the pair to the left of the strike is the call, the pair to the right is the put.
The leg appears in Entries with one lot, as a MARKET order, with no stop loss and no target. Everything about it can be changed in that table before you place it — see Entries.
Press B or S again and a second leg is staged. A short straddle is two presses: S on the call side of the 24,250 strike and S on the put side of the same row.
Choosing the lots before you stage
#Hover over a premium and a small + and − appear at the left edge of that cell. They set how many lots the next leg staged on that strike and that side will carry.
Press + twice and an amber chip reads the quantity you have chosen. Press S and that leg arrives in Entries with three lots instead of one, and the chip turns orange.
It is one chip going through two stages: amber while you are choosing, orange once the leg is staged. They never both show for the same side, so the chain and the Entries row can never disagree.
The coloured chips, and what each one means
#Every chip is the same small badge above the premium, top right. Only the colour differs.
- Green — you are long that contract. The number is the net quantity.
- Red — you are short it.
- Orange — a leg on that strike is staged in Entries and has not been placed.
- Amber — the lot count you are choosing with the + and − pins, before staging.
- The green and red chips are a net figure per strike and per side. If you are long 75 and short 75 of the same contract, there is no chip at all, because you hold nothing.
Before you log in
#Logged out, the chain is real — the strikes and the prices are the market’s, taken once when the page opened. They do not tick, and the blue line at the top says so.
The rest of the terminal is loaded with a sample short straddle so you can try the buttons. Everything marked SAMPLE is made up; nothing you press reaches a broker.
When the chain looks wrong
#The three that come up.
- A strike shows
-instead of a price. That contract has no price yet — usually a far strike nobody has traded. Its B and S buttons stay switched off, because a leg cannot be staged without a price. - The in-the-money side is short. Expected above 15 strikes — see how many strikes to show.
- An expiry you picked is taking time. Only the nearest weekly and nearest monthly are kept ready; every other date is built when it is asked for.