Start Here
Payment & Subscription
Understand Razorpay payment, existing/new user purchase, GST, emails, activation, and invoice download.
How subscriptions work?
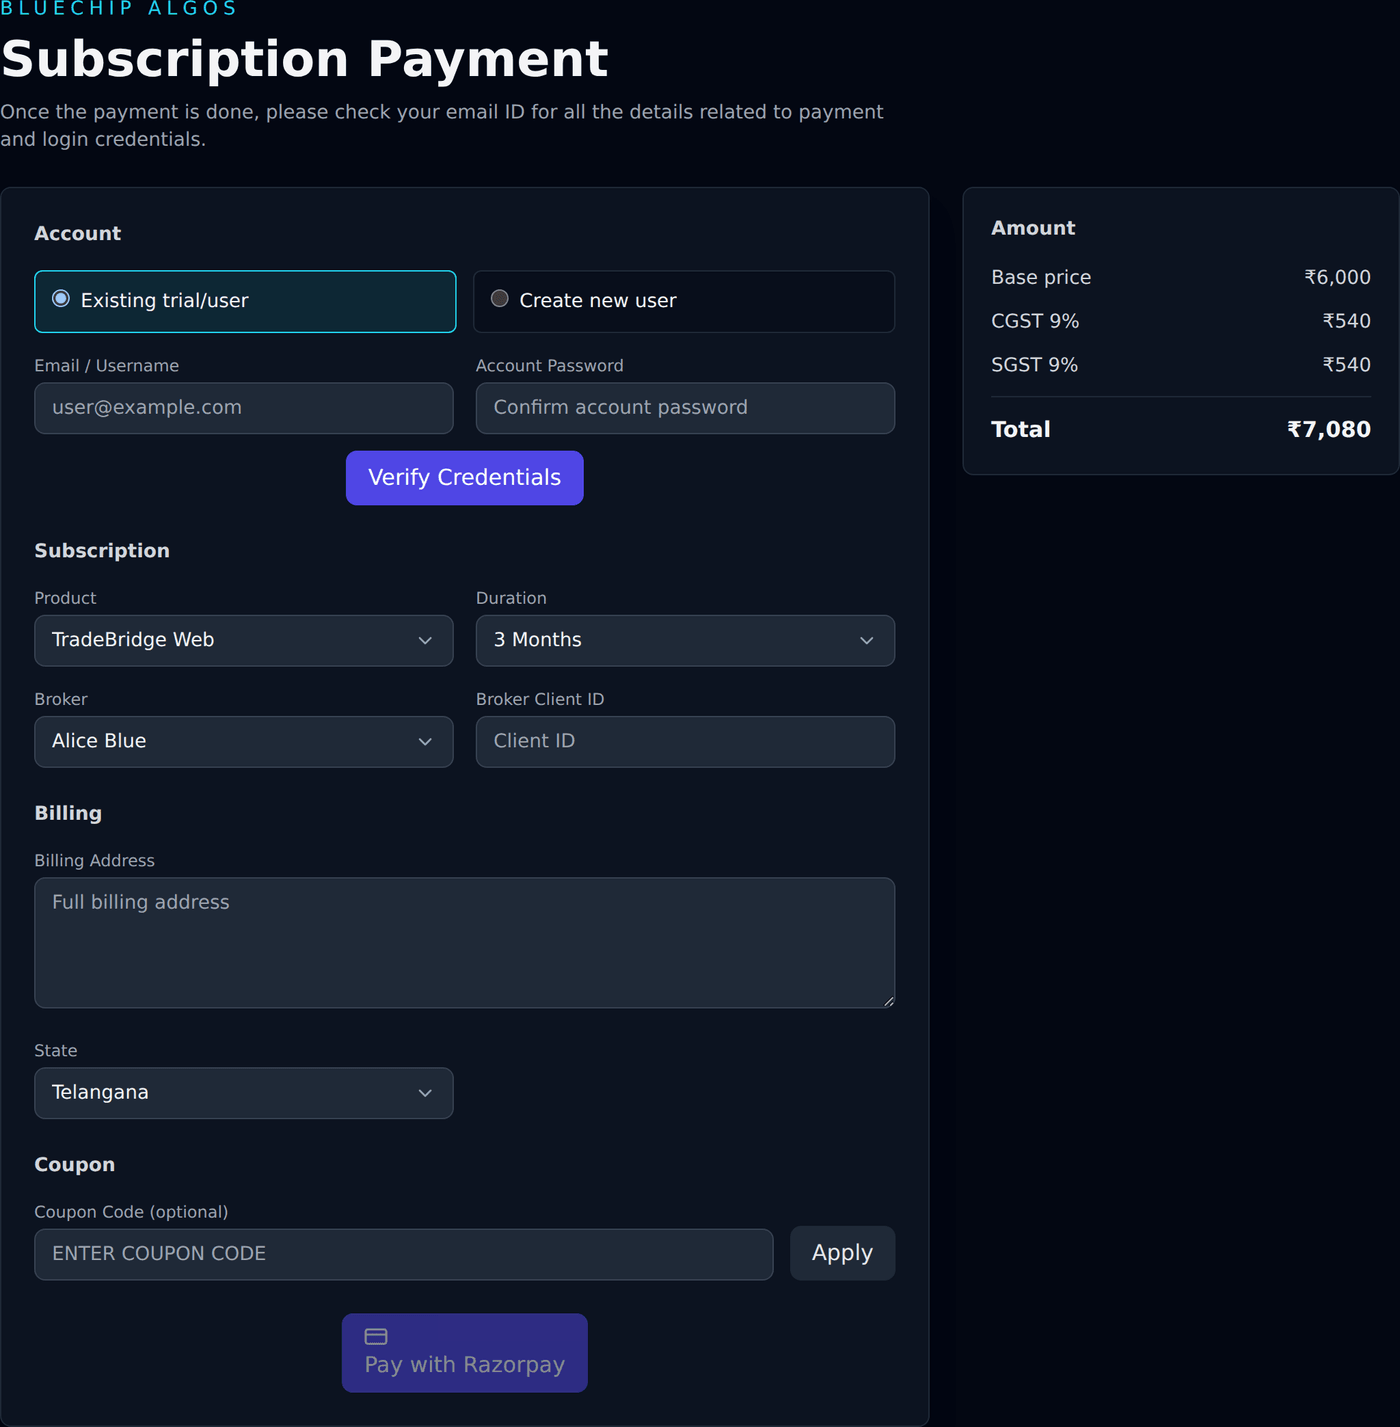
#Use the Payment page to activate or extend a product subscription.
Subscriptions are product-level. TradeBridge Web, TradeBots Web, TradeBuilder Web, TradeScalper Web, Trade Scalper Desktop and Trade Disc Desktop each have their own subscription. Broker accounts do not have their own subscription dates.
Existing trial/user
#Choose Existing trial/user when you already have a platform account.
Enter Email / Username and Account Password. The backend verifies the password before creating the Razorpay order. If the email is not found, inactive, or password is wrong, payment cannot start.
Create new user
#Choose Create new user when the client does not already have a platform account.
Enter Full Name, Email / Username, Phone, and Password. Password must follow the same strong password rule: at least 8 characters with uppercase, lowercase, number, and special character.
New user duplicate checks
#For a new user, the backend checks whether email, phone, and broker client ID are already used.
If any of these already belong to another active account, payment order creation can fail. This prevents duplicate users and wrong broker linking.
Product
#Product decides which subscription is activated or extended.
Products come from backend payment options. Examples include TradeBridge Web, TradeBots Web, TradeBuilder Web, TradeScalper Web, Trade Scalper Desktop, and Trade Disc Desktop.
Trade Scalper Desktop and Trade Disc Desktop are priced separately, exactly like the web products. Buying one does not include the other.
Duration
#Duration decides how long the selected product subscription is added.
Current default plan durations in code are 3 Months and 1 Year, unless admin-configured pricing changes them.
Broker
#Broker is the broker type linked during payment.
The payment page lists every broker the platform currently supports. , and accounts get a free lifetime licence for execution — WhatsApp 9398840360 for details. The other brokers do not carry that free licence.
Broker Client ID
#Broker Client ID is required during payment.
For existing users, the backend checks that this broker client ID is not assigned to another user. If it already exists under the same user and broker, it can be reused. If it belongs to someone else, payment is blocked.
Billing Address
#Billing Address is required for invoice and GST record.
Enter the full billing address clearly. This value is later shown in payment history and invoice.
State
#State is required for GST calculation.
If State is Telangana, the amount panel shows CGST 9% and SGST 9%. For other states, it shows IGST 18%.
Amount panel
#The amount panel shows Base price, GST, and Total before payment.
Review the selected product, duration, broker, client ID, billing state, and total amount before clicking Pay with Razorpay.
Pay with Razorpay
#Click Pay with Razorpay to open Razorpay Checkout.
If Razorpay script cannot load, refresh and try again. If the Razorpay popup is blocked, allow popups and try again.
Payment failed
#If Razorpay reports payment failed, the page shows the failure message and payment is not activated.
Try again only after checking entered details. If money is debited but activation is not visible, contact support with the Razorpay/payment reference.
Payment received but verification failed
#After Razorpay payment, the platform verifies the payment signature with backend.
If verification fails, the page says payment was received but verification failed. Contact support with the payment reference so it can be checked safely.
Payment successful message
#After successful verification, the page shows Payment successful.
It shows product name, subscription end date, broker, client ID, registered email, and payment reference.
Subscription activation
#After payment is verified, the selected product subscription is activated or extended.
For an existing active subscription, the backend extends from the later of today or the current subscription end date. This helps avoid losing remaining subscription days.
New paid account creation
#If you selected Create new user, the backend creates a paid user account after payment succeeds.
The broker client ID is linked to that new account and the account becomes a paid account.
Emails after payment
#After successful payment, the backend sends payment-related emails.
The user receives a payment confirmation email with amount, payment date, and reference. The user also receives an activation/profile email with account/product details. The payment page also says confirmation and activation emails were sent to the registered email.
Download invoice from Settings
#Invoices are not downloaded from the payment success box directly.
After login, open Settings, go to Payments, and click Download Invoice for the paid payment. The backend allows invoice download only for paid payments.
Refresh after payment
#If the app still shows a subscription warning after successful payment, refresh the page or log out and log in again.
The platform syncs user subscription details after login/session refresh.
Subscription warning
#A subscription warning appears when the selected tool is not active for your account.
You can browse some pages, but restricted actions such as saving strategies, connecting brokers, placing orders, and changing runtime controls are blocked. Use Payment to activate or extend the needed product.