Strategy Automation Tools
Trade Bridge Strategies
Detailed guide for Trade Bridge Strategies page, icons, fields, and examples.
Overview
#Trade Bridge Strategies is where you create webhook-based strategies and manage existing strategies.
A Trade Bridge strategy normally receives an external signal from TradingView, Python, or another source, then sends orders through the selected broker.
Strategy list icons
#The Strategies page shows Today’s Strategies first, based on Active Weekdays for the current IST day, followed by All Strategies.
Action icons beside each strategy include webhook details where available, edit, pause/resume, duplicate, and delete.
- Link icon: view webhook URL/token details for Trade Bridge.
- Pencil icon: edit strategy fields.
- Pause icon: stop new entries without deleting the strategy.
- Play icon: allow entries again for a paused strategy.
- Copy icon: duplicate the saved strategy as a new strategy with copied settings and new webhook details.
- Trash icon: delete the strategy after confirmation.
Webhook URL and token
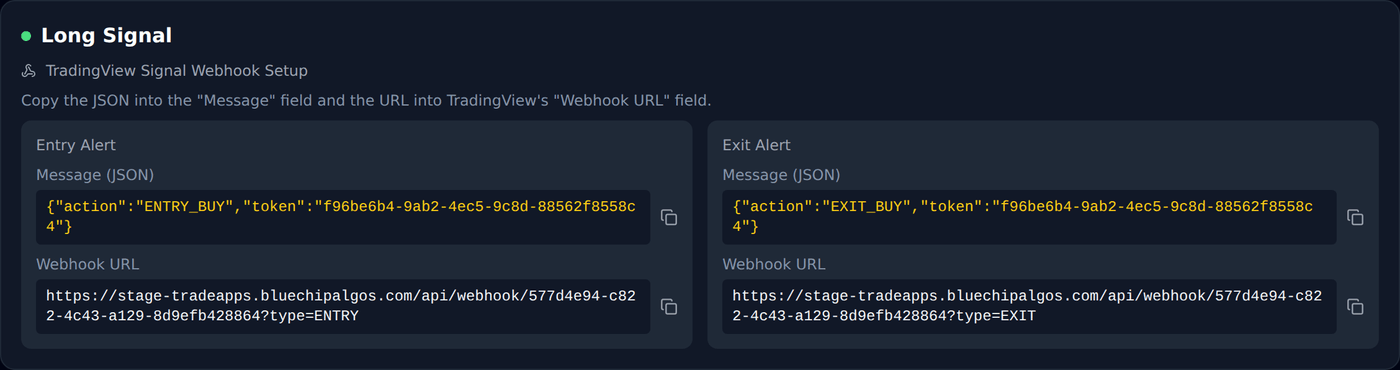
#Open Trade Bridge, go to Strategies, and click the webhook/link icon beside the saved strategy.
That panel shows the webhook URL and token details for the selected strategy. Copy them from there into TradingView or another external signal sender. Treat the webhook token like a password and do not share it publicly.
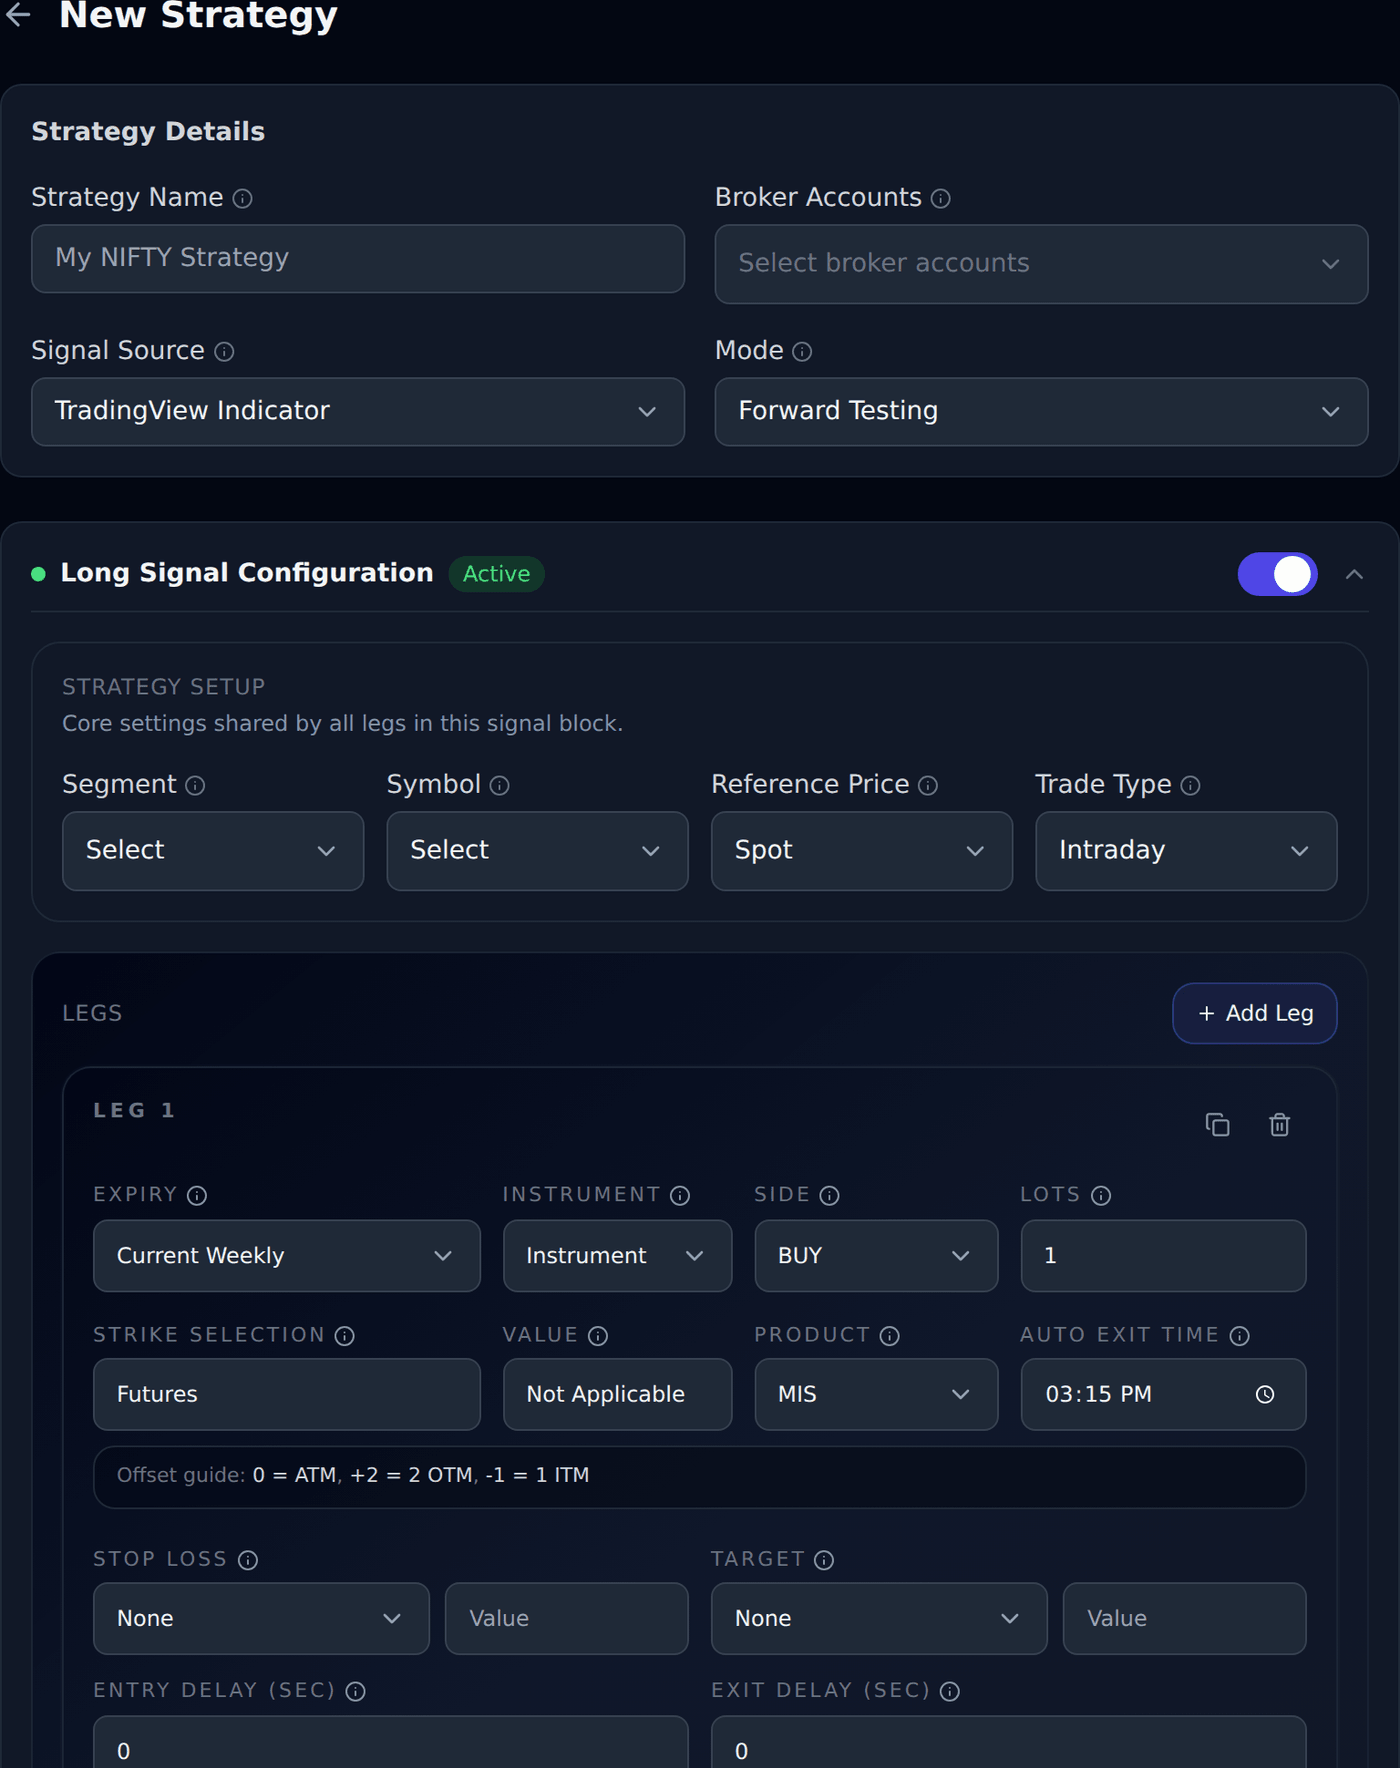
Strategy Name
#Strategy Name is the label you use to recognize this setup later.
Use a clear name such as NIFTY BUY Breakout or BankNifty Python Signal.
Broker Accounts
#Broker Accounts decides which connected broker accounts this strategy can use for order placement.
Select at least one broker account. If the list is empty, first finish API Integration for your broker or contact support because accounts are assigned and verified from the platform side.
Signal Source
#Signal Source tells Trade Bridge how to read the external alert.
TradingView Indicator is used when alerts come from indicator conditions. TradingView Strategy is used when alerts come from TradingView strategy alerts. Chartink Scanner is used when a Chartink scan sends the stocks that passed it. Python / Other Source is used when your own program sends the signal.
Each choice needs a different setup. An indicator uses a separate Entry alert and Exit alert per Signal block. A strategy script uses one Order fills alert plus small alert_message lines added in the Pine code — see Connecting a TradingView Strategy. A program of your own sends the signal itself — see Sending signals from Python. A Chartink scan sends stock names, so that one works differently again — see Connecting a Chartink scanner.
Connecting a TradingView Strategy
#A TradingView indicator can have a separate alert for each condition, so its Entry and Exit alerts are pasted one by one from the webhook panel. A TradingView strategy — a Pine script that places orders with strategy.entry and strategy.exit — is different. TradingView gives the whole script one alert, fired on every order fill, so that one alert must tell the platform which order just happened.
Save the strategy first, then open its webhook page — the link icon beside the strategy on the Strategies page. When Signal Source is TradingView Strategy that page shows a TradingView Strategy Setup panel instead of the per-signal webhook panels. It has two steps, and both are copy-paste.
Step 1 — in your Pine script. Every order call gets one extra argument called alert_message. Copy the matching line from the panel: the Long entry line goes inside your strategy.entry(...) call for the long side, and the Long exit line inside the matching strategy.exit(...) or strategy.close(...). If the strategy also has a Short Signal, add the short lines the same way.
Step 2 — in TradingView. Create one alert on the strategy with the condition set to Order fills. In the alert Message box paste exactly {{strategy.order.alert_message}}, and in the Webhook URL box paste the URL from the panel. When an order fills, TradingView replaces that message with the alert_message you attached to it, so every entry and exit arrives already labeled.
The alert still decides direction and timing only. What is traded — the strikes, lots, expiry, stop loss — always comes from the Signal blocks you configured here, exactly as with an indicator.
If trades are not firing, check three things in this order: the alert condition is Order fills, the Message box holds only {{strategy.order.alert_message}} with nothing extra, and every order call in the Pine code carries its alert_message line. An order call without one fills on TradingView but sends nothing here.
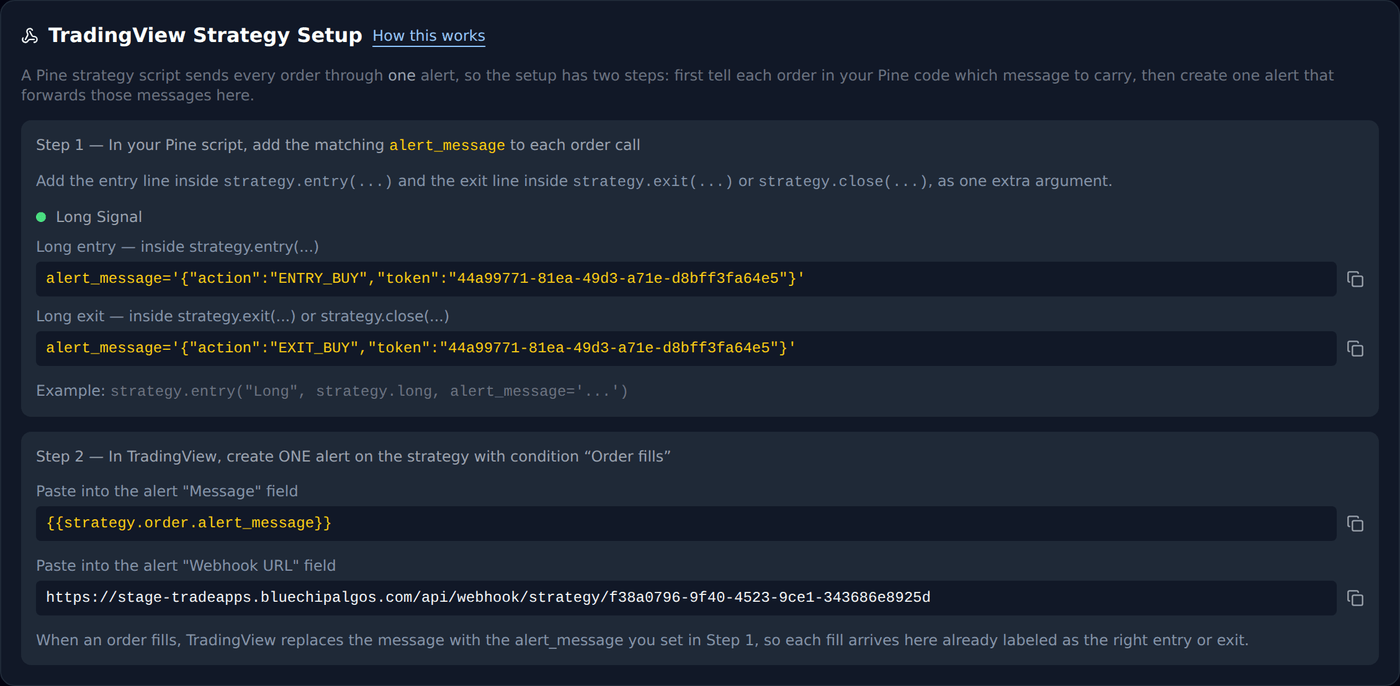
alert_message line inside each order call in your Pine code. Step 2 creates ONE alert on the strategy with condition Order fills, pasting {{strategy.order.alert_message}} into Message and the IP into Webhook URL.Sending signals from Python
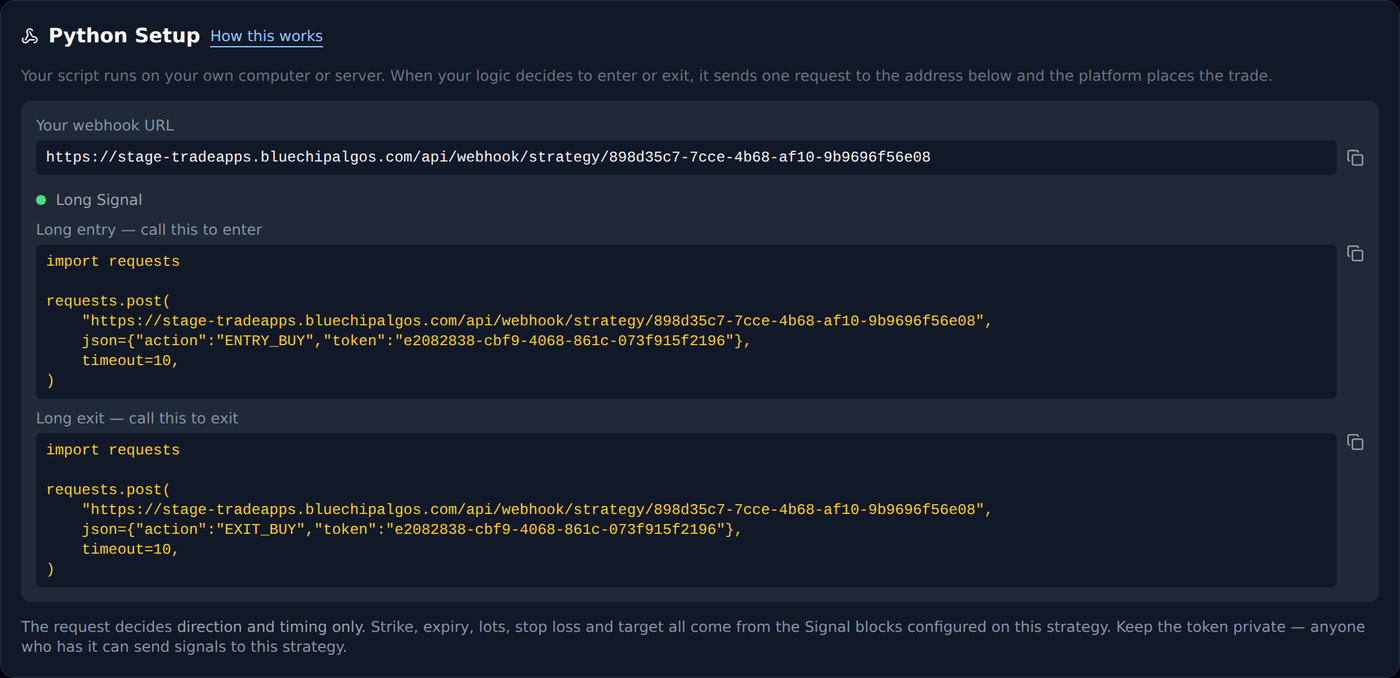
#If you already run your own program — in Python or anything else — it can send the signal directly. Set Signal Source to Python / Other Source, save the strategy, then open its webhook page from the link icon beside it on the Strategies page.
Your program runs on your own computer or server, not on ours. Whenever your logic decides to enter or exit, it sends one small message to the IP shown on that page, and the platform places the trade.
The page gives you a ready-made piece of code for each case — long entry, long exit, and the short pair if you use a Short Signal. Copy the one you need into your program at the point where that decision is made. Nothing else has to change.
The message decides direction and timing only. Which strike, which expiry, how many lots, the stop loss and the target all come from the Signal blocks you configured on the strategy — exactly as with a TradingView alert.
Two things to keep in mind. The token in that message is a password: anyone who has it can send signals to your strategy, so do not put it in a public place such as a shared repository. And your program has to be running for a signal to arrive — if the machine it runs on is switched off, no trade is placed and nothing is queued for later.
If nothing happens when your program runs, check that it received a success response back, that the IP was copied in full, and that the strategy is active and inside its Signal Start and End Time window. Signals that arrive outside that window are refused for entries.
Connecting a Chartink scanner
#Chartink is a scanner. You build the conditions on chartink.com, and whenever a scan runs, Chartink sends the list of stocks that passed it. That is the difference from every other Signal Source here: a TradingView alert says now, but a Chartink alert says now, and these stocks. Trade Bridge buys those stocks for you.
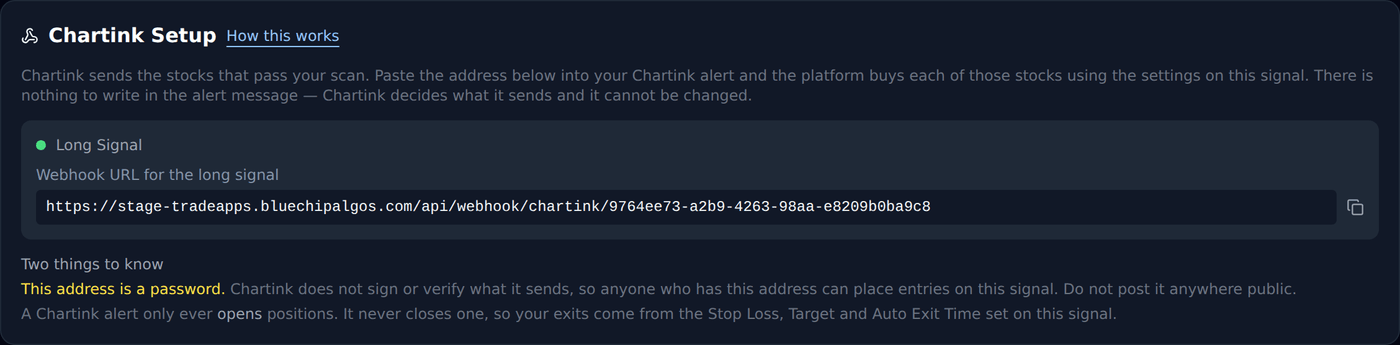
Set Signal Source to Chartink Scanner, save the strategy, then open its webhook page from the link icon beside it on the Strategies page. Copy the IP shown there into the webhook box of your Chartink alert. There is nothing to write in the alert message — Chartink decides what it sends and you cannot change it.
Because the scan names the stock, the fields that normally choose a contract are not shown for this Signal Source: Symbol, Segment, Reference Price, Expiry and Strike Selection all disappear. What stays is everything about how to trade: Side, Product, Quantity, Stop Loss, Target, Trailing Stop Loss, Auto Exit Time and the Signal Start and End Time.
These are cash shares, not options, so Quantity is a number of shares. Quantity 50 means 50 shares. A Chartink signal also has only one leg, because every leg would buy the very same stock.
Maximum Stocks At A Time is the limit that matters. A scan can easily return twenty stocks, and without a limit that is twenty orders at once. Say the scan sends RELIANCE, INFY and TCS and you set the limit to 2 — the platform takes RELIANCE and INFY, and skips TCS. Open the webhook page later and it shows you exactly which stocks were taken and which were skipped, with the reason.
A stock you are already holding from an earlier alert is never bought again. Scans usually run every few minutes and the same stock keeps passing, so without this rule one scan would stack the same position over and over.
A Chartink alert only opens positions. It never closes one. Chartink has no idea what you are holding — it only reports what passed the scan — so your exits must come from the Stop Loss, Target and Auto Exit Time you set on this signal. If you leave all three empty, nothing will close the position for you.
Treat that IP as a password. Chartink does not sign or verify what it sends, and it asks for no login, so anyone who has your IP can place entries on this signal. Do not post it in a public place. If you think it has leaked, delete the strategy and make a new one — that gives you a fresh IP.
If nothing trades, check these in order: the strategy is active and not paused, the time is inside Signal Start Time and End Time, the scan actually returned stocks, and you have not already hit Maximum Stocks At A Time. The webhook page lists every alert that arrived, so you can see whether Chartink reached us at all.
Account multipliers
#Set a separate multiplier for each selected broker account. It applies once to that account’s new entry size; the old shared control has been replaced.
Example: base 2 lots with account multipliers 1 and 2 produces 2 and 4 lots. Existing positions exit using actual fills. See Account multipliers.
Mode
#Forward Testing records the flow without placing live broker orders.
Live Trading can place real orders in the selected broker account when all checks pass. Use Live only after webhook, broker, quantity, and risk fields are verified.
Trade Type
#Intraday is for same-day trading. Positional is for carry-forward style trading where supported.
For positional trades, Product is forced to NRML and auto-exit behavior is restricted.
Product MIS / NRML
#MIS is normally used for intraday product type where broker supports it.
NRML is used for positional/carry-forward product type. Positional strategies must use NRML.
Long and Short Signal blocks
#Trade Bridge can have separate Long Signal and Short Signal blocks.
Enable only the signal blocks you want to use. Disabled blocks are ignored when saving.
Segment
#Segment decides the market type for the signal.
Available values are Index Options, Futures, and MCX options. Pick the segment that matches the instruments you want to trade.
Symbol
#Symbol is the underlying or trading symbol used by the signal, such as NIFTY, BANKNIFTY, SENSEX, or supported MCX symbols.
Choose the symbol before setting expiry and strike selection.
Reference Price
#Reference Price decides which price is used to resolve option strikes.
Spot is the normal display reference. Futures or synthetic references should be used only when your strategy needs that behavior.
Signal Start and End Time
#Signal Start Time is when new webhook entries are allowed to begin.
Signal End Time is when new webhook entries are blocked. Exit actions may still close active positions.
Active Weekdays
#Active Weekdays decide which days the signal accepts entries.
If Monday is not selected, Monday webhook entries are blocked for that signal.
Legs
#Legs are the actual orders inside a signal.
A signal can have one or more legs. For example, a simple BUY option strategy can use one CE BUY leg. A spread can use multiple buy/sell legs.
Duplicate Leg copies the last configured leg into a new leg so repeated leg setups can be adjusted faster.
Instrument Type
#Instrument Type defines whether the leg is CE, PE, FUT, or EQ depending on segment.
For an option BUY example, select CE or PE based on your strategy direction.
Expiry
#Expiry decides which contract expiry should be selected.
Use current weekly/monthly options depending on the symbol rules. Weekly futures and unsupported weekly MCX options are invalid.
Strike Selection
#Strike Selection controls how the option strike is chosen.
ATM/ITM/OTM offset is the easiest method: 0 means ATM, +1 means one OTM, and -1 means one ITM. Closest Premium and Closest Delta are advanced selection methods.
Entry and Exit Delay
#Entry Delay waits before sending this leg entry order after the signal arrives.
Exit Delay waits before sending this leg exit order after an exit trigger. Use delays carefully because price can change during the wait.
Auto Exit Time
#Auto Exit Time closes that leg after the configured time if it is still open.
Example: You enter a BUY option trade at 10:00 AM and set Auto Exit Time as 15:15. If the leg is still open at 3:15 PM IST, the system tries to exit it automatically.
This is useful for intraday trades where you do not want a leg to remain open after your planned exit time.
Stop Loss
#Common example: You BUY one option at entry price Rs 100. Quantity is 1. Initial Stop Loss is Rs 90 unless the section says otherwise.
If Stop Loss type is Points and value is 10, the stop loss is Rs 90. That means if the option falls from Rs 100 to Rs 90, the system tries to exit to limit the loss.
If Stop Loss type is Percent and value is 10, the stop loss is also Rs 90 because 10% of Rs 100 is Rs 10.
If Stop Loss type is MTM and value is 10 with quantity 1, the system watches for Rs 10 total loss. With entry Rs 100, that is the same as price falling to Rs 90 in this simple quantity-1 example.
When Stop Loss is placed as a broker-terminal SL-L order, the default trigger-to-limit buffer is 19%.
Target
#Common example: You BUY one option at entry price Rs 100. Quantity is 1. Initial Stop Loss is Rs 90 unless the section says otherwise.
If Target type is Points and value is 30, the target is Rs 130. That means if the option rises from Rs 100 to Rs 130, the system tries to book profit.
If Target type is Percent and value is 30, the target is also Rs 130 because 30% of Rs 100 is Rs 30.
If Target type is MTM and value is 30 with quantity 1, the system watches for Rs 30 total profit. With entry Rs 100, that is the same as price reaching Rs 130 in this simple quantity-1 example.
Trailing Stop Loss
#Trailing Stop Loss moves the stop loss upward as a BUY trade moves in profit. It does not move the stop loss down when price falls.
Example: You BUY one option at Rs 100 with initial SL at Rs 90. Trail Every X is 10 points and Trail By Y is 5 points.
When price reaches Rs 110, the trade has moved 10 points in profit, so SL trails by 5 points: SL moves from Rs 90 to Rs 95.
When price reaches Rs 120, the trade has moved another 10 points in profit, so SL trails by another 5 points: SL moves from Rs 95 to Rs 100.
When price reaches Rs 130, SL can move to Rs 105, and so on. This protects more profit step by step while the trade continues.
Trail To Cost
#Trail To Cost, or T2C, moves stop loss to your entry price after the trade gives enough profit.
Example: You BUY one option at Rs 100 with initial SL at Rs 90. T2C trigger is 20 points.
If price moves only to Rs 110, T2C does not activate because profit is only 10 points.
When price reaches Rs 120, profit is 20 points, so T2C activates and SL can move from Rs 90 to Rs 100.
After this, if price falls back to Rs 100, the trade is protected at cost instead of taking the original Rs 10 loss.
Wait and Trade
#Wait and Trade tells a leg not to enter the moment the signal comes. It waits until the price moves by the amount you set, and enters then.
The number is a price direction, not a profit direction. A plus number waits for a higher price and a minus number waits for a lower price, and it reads the same whether your leg buys or sells.
Example: the signal comes when the option is at Rs 100 and you set Wait and Trade 2 Points. The leg does not enter at Rs 100. It waits until the price is Rs 102 or more, and enters there.
Example with a minus: the same signal with Wait and Trade -2 Points enters when the price falls to Rs 98 or lower.
You can also use % instead of Points. On a Rs 100 option, 5% waits for Rs 105 and -5% waits for Rs 95.
If the price never reaches your level, no order is placed at all. The wait ends at that leg Auto Exit Time, and the order shows as cancelled with the reason.
While a leg is waiting, the dashboard shows Waiting to enter, and nothing is sent to your broker until the price arrives.

After Stop Loss: Re-Entry and Re-Execute
#After Stop Loss decides what a leg does once its stop loss is hit. There are three choices: Do nothing, Re-Entry, and Re-Execute.
Re-Entry waits for the price to come back to your original entry price and enters the SAME strike again. Example: you BUY at Rs 100 and your stop loss takes you out at Rs 90. The leg then waits, and only when the price climbs back to Rs 100 or higher does it buy that same strike again. If the leg SOLD at Rs 100 and was stopped out at Rs 110, it waits for the price to come back down to Rs 100 or lower.
Re-Execute does not wait. It enters again straight away, and it picks the strike using your leg settings at that moment. So an ATM leg takes whatever is ATM now, which is usually a DIFFERENT strike from the one that was stopped out. That is the point of it.
How many times is the number of EXTRA entries after the first one. If you set 3, the leg can enter up to 3 more times in the day, so up to 4 entries in total. You can set up to 100.
Think about the number before you set a big one, especially with Re-Execute. Every attempt is a real order at your broker, with the brokerage and charges that go with it, and Re-Execute goes back in the moment the stop loss is hit rather than waiting for anything. On a choppy day a high number can mean a great many orders.
Both of them run your whole leg setup again, including Wait and Trade, stop loss, target, trailing stop and Auto Exit Time. It is not just buying again; it is running that leg again.
Only a plain stop loss starts this. If the leg was closed by a trailing stop, by Trail To Cost, by its target, by Auto Exit Time, or by you exiting manually, nothing re-enters.
The count resets every day, and anything still waiting is dropped at that leg Auto Exit Time. While a leg is waiting to go back in, the dashboard shows Waiting to re-enter with the attempt number.
Your position stays in the same trade. A re-entry is not a new signal, so it does not need a new alert and does not use a new position slot.
Orders in Terminal
#Orders in Terminal decides whether your Stop Loss and Target are also placed as real orders sitting in your broker terminal.
A new strategy starts at Stop Loss. If this platform or your internet connection stops for any reason while a position is open, a stop loss already resting at your broker can still close it for you. That is why it is the starting choice.
None means nothing is placed at your broker. The platform still watches your levels and sends the exit when one is reached, but only for as long as it is running.
Both places a Stop Loss and a Target at your broker. Your broker counts these as two separate sell orders against one position, so the second one needs full margin, as though you were opening a fresh position rather than closing this one. If that margin is not free in your account the broker refuses it, and you are told when that happens. Choose Both only if you keep spare margin for it.
Whatever you choose here, the platform keeps watching your levels itself as well, so a refused or cancelled broker order does not leave the position unwatched.
Overall SL and Target
#Overall Stop Loss and Overall Target work on combined signal MTM, not just one leg price.
Example: Your signal has two legs. Leg 1 is showing Rs 700 profit and Leg 2 is showing Rs 300 profit. Combined MTM profit is Rs 1000.
If Overall Target is Rs 1000, the system tries to exit the full signal when the combined profit reaches that level. In the same way, Overall Stop Loss exits the full signal when combined loss reaches the configured amount.
Signal Trail To Cost
#Signal Trail To Cost is different from leg Trail To Cost.
It works across the signal and applies once on the first eligible stop-loss hit. Remaining open legs that already had an initial stop loss can move their stop loss to entry price, unless they already have a better stop.
This setting needs at least two legs with an initial stop loss. If only one eligible leg exists, the form blocks saving because there is no remaining leg to protect.
Lock & Trail Profits
#Lock & Trail Profits is signal-level profit protection based on combined MTM.
Exact field names in the tool are If Profit Reach, Lock Min Profit At, Increase in Profits, and Trail Min Profit By.
If Profit Reach is the first open-profit level where protection starts. Lock Min Profit At is the minimum profit you want to protect after that first level is reached.
Increase in Profits is the next profit step. Trail Min Profit By is how much the protected minimum profit increases after each step.
Example: If Profit Reach is Rs 1000 and Lock Min Profit At is Rs 500, then when open profit reaches Rs 1000, the system starts protecting Rs 500. If profit later falls to Rs 500, exit can trigger.
Continuing the same example: if Increase in Profits is Rs 500 and Trail Min Profit By is Rs 250, protected profit becomes Rs 750 when open profit reaches Rs 1500. It becomes Rs 1000 when open profit reaches Rs 2000.
In automated strategies, this exits the full signal if combined MTM falls back to the protected profit floor. It does not place a separate broker-terminal order.
Max Concurrent Positions
#This limits how many active executions the signal can hold at once.
Example: If Max Concurrent Positions is 1 and one trade is already running, the next webhook entry is blocked until the first trade is closed.
If you set it to 2, the signal can hold up to two active executions at the same time. Beginners should usually keep this low to avoid accidental repeated entries.
Terminal Order Failover
#Terminal Order Failover is used with broker-terminal protective orders.
If a pending broker protective order is not usable when risk is breached, the platform can try an app-side fallback exit.
All or None
#All or None applies when a signal has multiple legs.
If one entry leg is rejected or cancelled, filled legs can be exited automatically so the strategy does not remain half-entered.
Common BUY example used in docs
#Use this same simple example while reading risk fields: BUY one option at Rs 100, quantity 1, initial SL Rs 90.
Stop Loss 10 points means exit at Rs 90 if the price falls.
Target 30 points means book profit at Rs 130 if the price rises.
Trailing Stop Loss with X 10 and Y 5 means SL moves from Rs 90 to Rs 95 at price Rs 110, then to Rs 100 at price Rs 120, then to Rs 105 at price Rs 130.
Trail To Cost 20 points means SL moves to the entry price Rs 100 only after price reaches Rs 120.