Discretionary Trading Tools
Trade Disc Dashboard
The four panels — Entries, Adjustments, Live Positions and Global Settings — and the rules that watch the whole book.
One page, four panels
#The Trade Disc dashboard is the whole tool. There is no second screen to open and nothing hidden behind a menu, because a trader adjusting a live position cannot afford to go looking for a control.
The option chain runs down the left. Down the right sit Entries (what you are about to send), Adjustments (what you hold, and the buttons that change it), Live Positions (the day, the way your broker shows it) and Global Settings (the rules that watch everything).
On a phone the same five panels stack top to bottom in that order and the page scrolls. Nothing is dropped on a small screen.
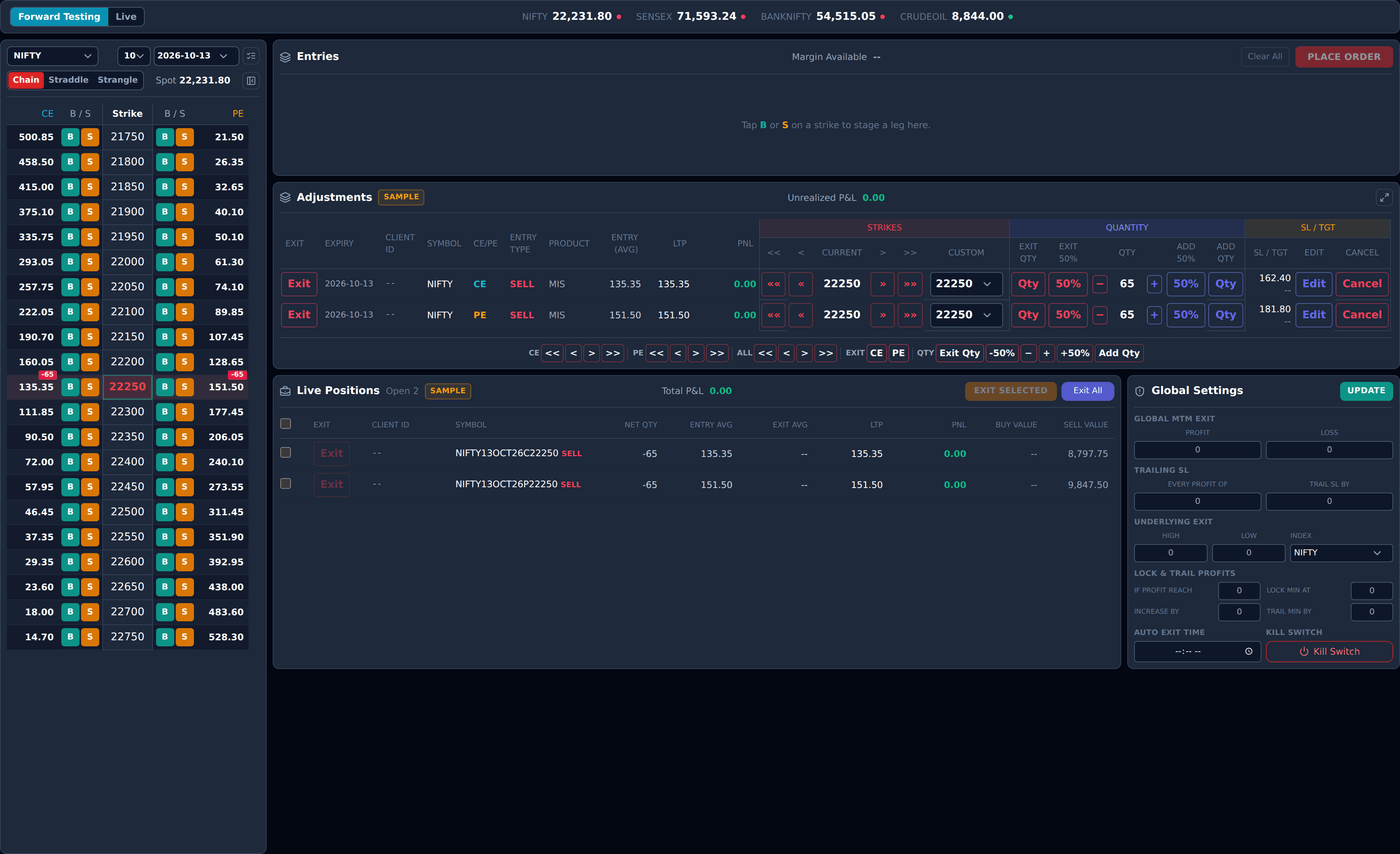
The top strip
#Three things live along the top, and only three.
- On the left, the mode switch: Forward Testing or Live. Live is filled red. Nothing reaches your broker in Forward Testing.
- In the middle, the market watch — NIFTY, SENSEX, BANKNIFTY and CRUDEOIL, with a small dot beside each. Green means the price is live; red means it has gone stale and should not be traded off.
- On the right, the gear. It opens Configuration, where you choose which broker accounts Trade Disc trades.
Where the money figures are?
#There is no profit and loss in the corner of the header. Each figure sits centred in the title row of the panel it describes, because a number is easier to trust beside the rows it was added up from.
- Margin Available over Entries — funds across every connected account, above the panel where you decide what to spend them on.
- Unrealized P&L over Adjustments — the live profit and loss of the legs that are still open, above the panel that changes them.
- Total P&L over Live Positions — booked plus unrealized across exactly the rows shown there, so the figure and the PNL column can never disagree.
- A figure reads
--when the platform has not been told yet, rather than a confident0.
Entries — the legs you have not sent yet
#Entries is a staging table. Legs arrive here when you press B or S on the chain, and nothing in this panel has reached your broker. You can add legs, edit them, delete them or clear the lot, and no order exists until you press Place Order.
That is what makes a multi-leg position practical: build all four legs, check them, then fire them together.
Each row can be edited in place.
- Product —
MISfor intraday orNRMLto carry the position. - Qty (lots) — lots, not units. The platform multiplies by the contract’s own lot size.
- Entry — the green BUY / amber SELL button. Click it to flip the leg to the other side without deleting it.
- Order —
MARKETorLIMIT. - Price — only for a LIMIT leg. A price you type is used exactly as you typed it; nothing re-prices it.
- SL and Target — an optional level for that leg, with the unit beside it:
PTS,%,MTMorABS. - The bin icon on the left removes one leg. Clear All removes them all.

Place Order, and the order the legs go out in
#Place Order sends every staged leg. Two rules apply and both are printed under the table.
First, BUY legs are placed before SELL legs. On a spread the bought leg is what earns the margin benefit, so sending it first is what stops the sold leg being rejected for margin you were about to have.
Second, an order you marked MARKET is sent to the broker as a limit order with a buffer, because SEBI does not allow market orders through a broker API. It is still meant to fill immediately; it is simply not typed as the word "market".
A leg is placed once per account. If one account rejects it, that account gets a rejected row and the others are unaffected — the rest of the basket is not rolled back.
An order that has not filled yet
#A LIMIT order sitting at your broker is not a position. It shows in Adjustments with an amber Pending tag, and every button on that row is switched off except Cancel.
There is no way to modify a resting order from this screen. Cancel it and place it again — that is one deliberate action rather than two orders racing each other at the exchange.
Once it fills, the tag goes and the whole row comes alive.
Live Positions — the day, the way a broker shows it
#Where Adjustments is one row per leg, Live Positions is one row per contract, per broker account — every entry, add and exit on that contract folded into a single line, whether it is still open or already closed.
That last part matters: a contract you closed at 10 o’clock stays on the panel for the rest of the day, marked Exited, carrying the money you made or lost on it. The header counts both, reading for example Open 2 · 6 today.
Two accounts at two brokers holding the same contract are two rows, never one. That is why Client ID is a column, and why it comes before Symbol.
- Net Qty — what is still open. A negative number means you are short.
- LTP — the contract’s current price.
- PNL — booked and unrealized together, for that contract on that account.
- Buy Value and Sell Value — the money actually transacted, entries and exit fills alike, exactly as your broker’s position book counts it.
- Rows are ordered still open first, then most recently traded, so the afternoon’s work is never buried under the morning’s.
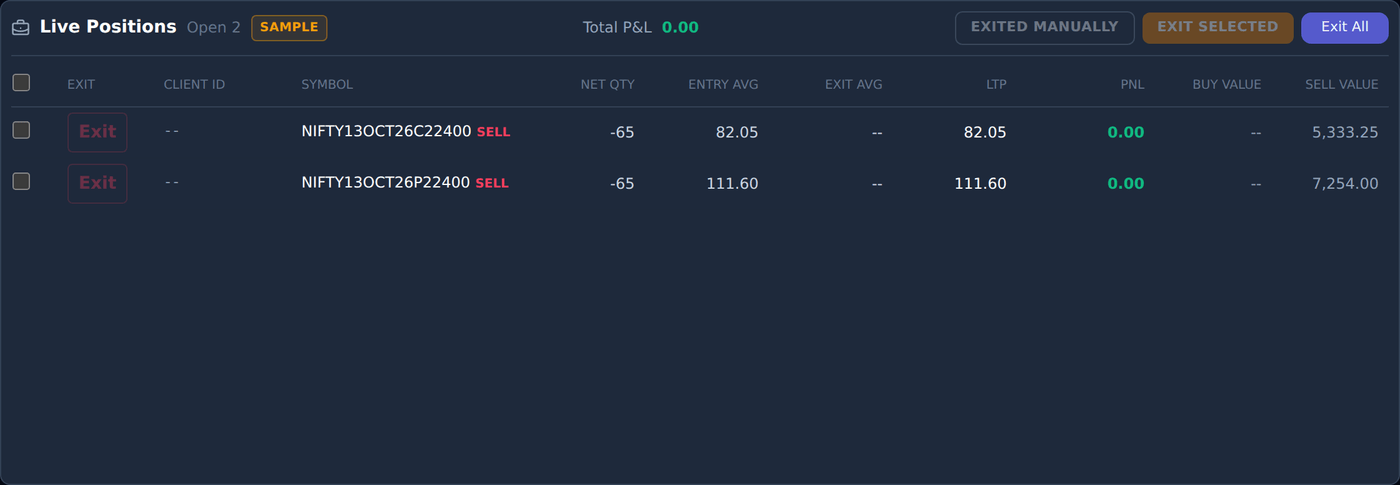
Exit Selected and Exit All
#Tick the box on one or more rows and Exit Selected closes every open leg behind them. The button counts what you have ticked.
Exit All closes every open position on the panel, on one plain click — the same button, the same behaviour, as Trade Scalper. There is no hold and no confirmation.
Both act on what is on screen, which is why the account selection in Configuration matters: an account you have not ticked is not shown, and is not exited.
Every leg is tried once. A leg whose exit is rejected stays open with the rejection visible, and is not tried again on its own.
Exited Manually is for positions you have already closed in your broker’s terminal. Tick them and press Exited Manually: a small window asks for the price you exited at, one box per position. Press Record Exit and Trade Disc closes them at those prices, so your P&L and reports match what really happened. Nothing is sent to the broker, and the stop loss and target on those legs stop.
Global Settings — rules that watch the whole book
#These are account-level rules, checked about once a second against the whole day — the profit and loss you have already booked plus what is open right now. They can only close positions; none of them can open one.
Type the numbers and press UPDATE. An empty box means that rule is switched off. RESET empties every box and, if the book has been latched shut, reopens trading.
Live and Forward Testing are counted apart. Your forward-testing profit and loss never counts towards a Live limit, and a Live limit that fires never stops you forward testing. The same settings apply to both, but each book is judged on its own money. The one exception is Auto exit time, which is a clock rather than a money rule: at that minute everything you hold is closed, in both.
- Global MTM exit — Profit / Loss. The day’s profit or loss at which everything is squared off. Put
5000in Profit and the book closes when the day is up Rs 5,000. - Trailing SL — Every profit of / Trail SL by. Moves the loss limit up as the day goes your way. See the worked ladder below.
- Underlying exit — High / Low / Index. A level on the index itself rather than on your money. Set High
24300on NIFTY and everything is squared off the moment NIFTY trades at or above 24,300. - Lock & trail profits. Protects a profit you have already made, rather than capping it. Worked through below.
- Auto exit time. A time of day, in IST on the 24-hour clock. At
15:15every open position is closed. It fires once a day, whatever the brokers answer. - Kill switch. Squares everything off and locks Trade Disc for the rest of the day. It cannot be undone until tomorrow — it is the same Kill Switch, with the same wording, as every other tool.
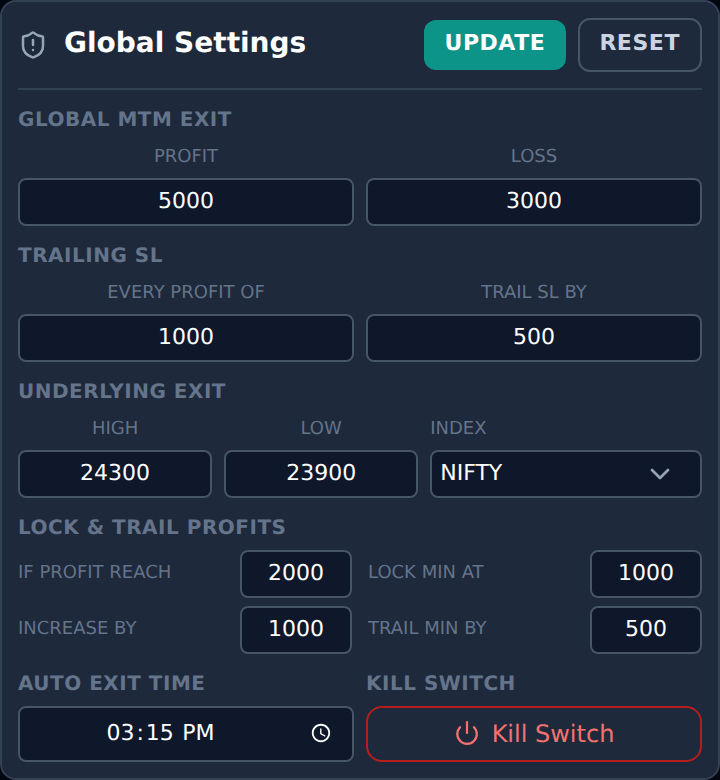
Trailing SL, with numbers
#Trailing SL moves your loss limit, and it only ever moves it in your favour. It needs the Loss box filled in to have something to move.
Say Loss is 3000, Every profit of is 1000 and Trail SL by is 500.
The first move happens as soon as the day is up by the trail amount, and after that every Rs 1,000 of profit moves it another Rs 500:
- Start of the day — the book closes if you are down Rs 3,000.
- The day reaches +Rs 500 → the limit moves to Rs 2,500 down.
- The day reaches +Rs 1,500 → Rs 2,000 down.
- The day reaches +Rs 2,500 → Rs 1,500 down.
- It never moves back. A day that gets to +Rs 2,500 and falls away is closed at Rs 1,500 down, not at Rs 3,000 down.
Lock & trail profits, with numbers
#This one protects a profit instead of capping a loss. Four boxes, and it is easiest read as a sentence: once I am up this much, never let me finish below that much — and keep raising the floor as I go.
Say If profit reach is 2000, Lock min at is 1000, Increase by is 1000 and Trail min by is 500.
- Nothing happens at all until the day is up Rs 2,000. Below that the rule is asleep.
- The moment it touches Rs 2,000 the floor is set at Rs 1,000. If the day now falls back to Rs 1,000, everything is squared off and you keep it.
- The day reaches Rs 3,000 → the floor rises to Rs 1,500.
- The day reaches Rs 4,000 → the floor rises to Rs 2,000.
- The floor is measured against the highest the day has been, so it never falls.
When a rule fires, it empties its own boxes
#A rule squaring the book off does one more thing: it clears the boxes that fired. A max loss that has just fired goes back to empty, and so does the trailing stop beside it.
That is what lets you carry on. Trading is never paused and there is no Reset to press — the protection has done its job and stops being armed, so the decision about what happens next is yours.
To carry on with the same protection, type the value back in and Save. To carry on without it, leave it empty. Either way the next order goes through.
If you want to keep going past a limit you have just hit, put in a bigger number. A max loss of Rs 5,000 that fired becomes Rs 8,000 if that is what you decide — the rule starts watching again from there.
Only the rule that fired is cleared. A lock and trail firing does not touch your max loss, and neither of them touches the underlying high and low.
Nothing is deleted. Orders, Analytics and the day’s booked profit and loss are all untouched. Your Live and Forward Testing books are separate here too: a rule firing on one leaves the other exactly as it was.
Configuration — which accounts trade
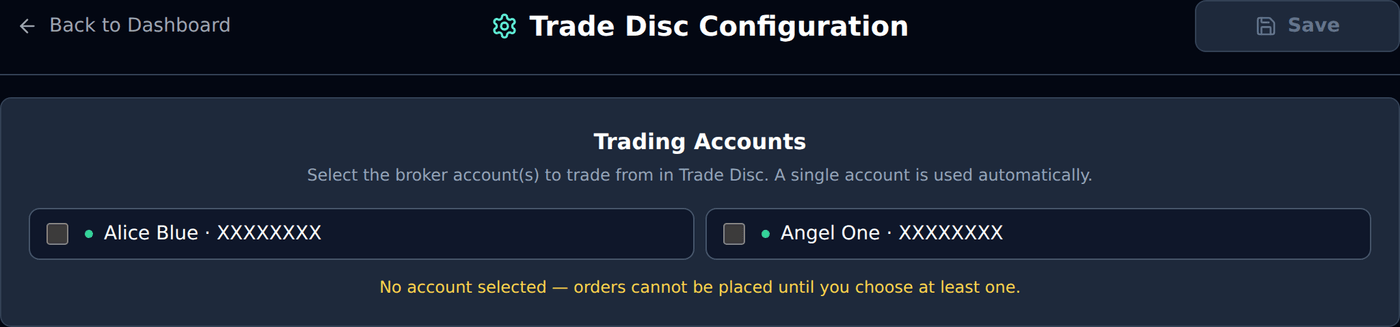
#The gear at the top right opens Trade Disc Configuration. It holds two things: Order Placing in Terminal and Trading Accounts.
Order Placing in Terminal decides who holds your stop loss and target: your broker, or Trade Disc. Pick SL to park the stop at the broker, Target for the target, Both for the pair, or None to let Trade Disc watch them.
The difference matters. An order parked at the broker sits on their system and works even if you close Trade Disc or lose your internet. One Trade Disc is watching only fires while Trade Disc is running — but it can do things a resting broker order cannot, such as trailing.
Tick the broker accounts Trade Disc should trade from and press Save. A green dot means that account has a live broker session; a red one means it does not.
If you have exactly one broker account it is used automatically and there is nothing to choose. With more than one, nothing is selected until you choose — the platform will not guess, because guessing means placing somebody’s order on the wrong account.
The choice is remembered, and it decides three things: which accounts orders go to, which rows appear in Adjustments and Live Positions, and therefore what Exit All closes.
What you see before you log in?
#Logged out, the dashboard is the real screen with real chain prices, taken once when the page opened. It carries a sample short straddle at the money so the adjustment controls have something to work on.
Both books mark those rows SAMPLE. Shifting, changing quantity or setting levels on them all work, and re-price from the chain — it is a demonstration, and nothing reaches a broker.
Placing an order, and anything in Live Positions or Global Settings, needs an account.
When something looks wrong
#In the order worth checking.
- Margin Available reads
--. No broker account has answered yet. Check the connection in Settings. - A position is missing from the book. It belongs to an account that is not ticked in Configuration.
- Place Order says to select an account. More than one account is connected and none is chosen. Open Configuration and tick one.
- A red bar says trading is paused. A Global Settings rule fired. Press RESET.
- Nothing can be placed and Kill Switch reads ON. The kill switch is locked until tomorrow, by design.
- A price has a red dot beside it in the market watch. That feed has gone stale. Do not trade off it until it goes green.